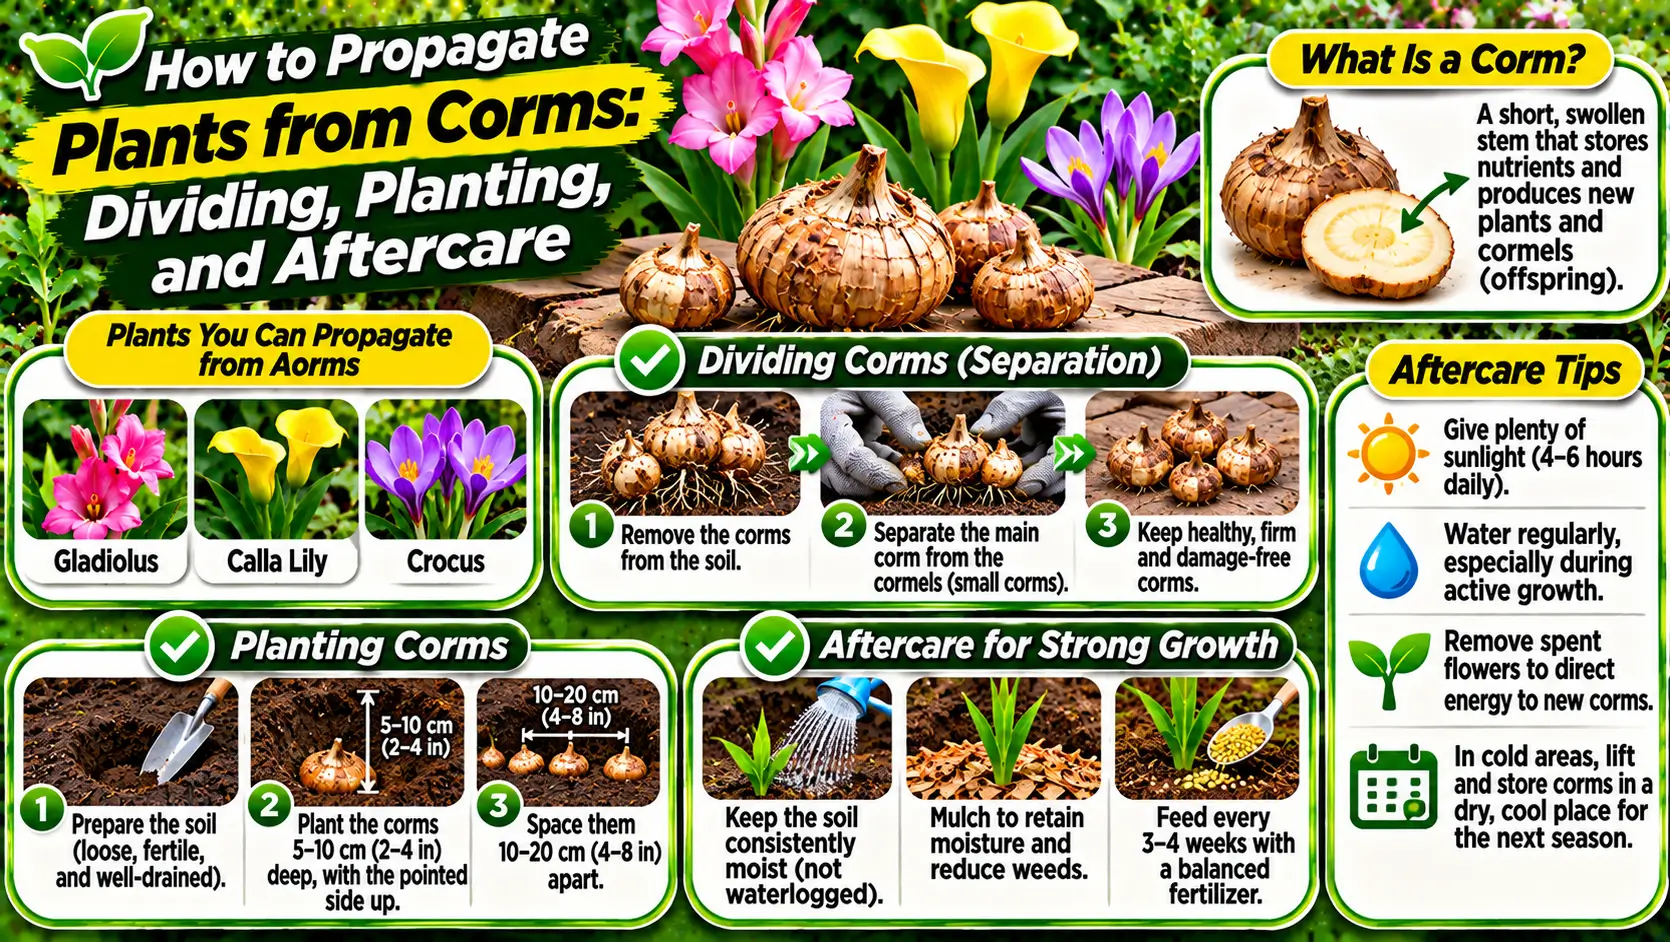
A corm is a swollen underground stem that stores energy and supports seasonal growth. It is solid inside, unlike a true bulb, which consists of layered fleshy scales. Gladiolus and crocus are familiar examples of plants that grow from corms, although their growing cycles and storage needs differ. A mature corm can produce shoots and roots, and many species form smaller cormels around the parent. These structures provide a practical way to multiply plants without relying only on seed.
Table of Contents
- Corms, bulbs, and tubers are not identical
- Selecting healthy corms
- Understanding the growth cycle
- When to lift and separate
- Cleaning and inspecting corms
- Separating cormels
- Planting depth and spacing
- Watering and feeding
- Storing dormant corms
- Common mistakes to avoid
- Growing a healthy collection
- Frequently Asked Questions
Corms, bulbs, and tubers are not identical
Corms are often confused with bulbs and tubers because all can grow below the soil and store energy. A bulb has a short stem surrounded by fleshy leaf bases, while a corm is a solid stem structure. A tuber is another type of swollen storage organ and may have buds or eyes across its surface. These differences matter because planting depth, division, curing, and storage procedures vary. Identify the plant’s actual storage structure before cutting or separating it.
Selecting healthy corms
Choose firm corms that feel solid and show no soft, wet, or foul-smelling areas. Avoid specimens with extensive mold, deep wounds, or shriveled tissue unless the species is naturally dormant and the condition is expected. Healthy cormels should be firm and sufficiently developed for the plant species. Do not collect or move plant material from areas where propagation is restricted or where the plant may be invasive. Use known, correctly identified stock from a reputable source.
Understanding the growth cycle
Corm-forming plants often have a seasonal cycle in which the old corm supports leaves and flowers while a new replacement corm develops. Small cormels may form around the new corm or at its base. The timing of lifting and separating depends on whether the plant is winter-growing, summer-growing, or evergreen in the local climate. Wait until the foliage has completed the process recommended for that species; removing leaves too early can reduce the energy stored for the next cycle.
When to lift and separate
For many garden corms, lifting is done after foliage naturally yellows or the plant enters dormancy, but some species are best left undisturbed in suitable climates. Dig carefully around the clump rather than pulling stems from dry ground. Remove loose soil and identify the new corm, old corm, and smaller cormels. Separate only when the structures can be detached without excessive damage. Follow local growing advice, because rainfall and winter temperatures influence whether corms should remain in the ground.
Cleaning and inspecting corms
Brush away loose soil and remove old, dried roots or spent corm tissue where appropriate. Do not aggressively scrape or cut healthy surfaces. Inspect for soft rot, insect damage, and unusual discoloration. Discard badly diseased material rather than storing it with healthy corms. If the species requires curing, allow the corms to dry in a shaded, airy location for the recommended period. Avoid direct intense sun or high heat, which can injure storage tissue.
Separating cormels
Small cormels can often be detached gently from the parent corm after lifting. Some are too small to flower in the next season and need one or more growing cycles to reach flowering size. Keep them labeled by species and variety, and separate damaged or diseased pieces. Planting cormels in a nursery bed or container can make it easier to monitor them. Use a spacing and depth suitable for their size and the plant’s natural requirements.
Planting depth and spacing
Plant corms with the correct orientation and at a depth recommended for the species and soil type. A common general approach is to place the growing point upward, but the exact depth varies with corm size, climate, and drainage. Small cormels are usually planted more shallowly than mature corms. Space plants so they have room to grow and air can move around foliage. In heavy soil, improve drainage or use raised beds rather than burying corms in persistently wet ground.
Watering and feeding
After planting, water according to the species’ growth cycle and the moisture already present in the soil. Some corms need moisture to initiate roots, while dormant corms may be vulnerable to rot if kept wet. Once active growth begins, maintain suitable moisture without waterlogging. Use a balanced feeding approach based on soil condition and plant requirements. Excessive nitrogen can encourage leafy growth at the expense of flowers or storage-organ development.
Storing dormant corms
Some corms are lifted and stored during a dormant season, especially where soil freezes or remains wet. Storage conditions vary widely: certain species need cool, dry, ventilated storage, while others require different temperature or humidity conditions. Label containers clearly and avoid sealing damp corms in plastic. Check stored material periodically for shriveling, mold, and rot. Do not assume that all corms can be stored together under identical conditions.
Common mistakes to avoid
Frequent errors include digging too early, damaging the replacement corm, confusing old and new structures, storing material before it is dry enough, and planting at an unsuitable depth. Small cormels may not flower immediately, so discarding them as failures can waste useful planting stock. Poor drainage is another major cause of loss. Research the species and keep records of lifting dates, storage conditions, planting depth, and flowering results.
Growing a healthy collection
Corm propagation works best when gardeners understand the plant’s seasonal cycle and handle storage organs gently. Select healthy material, separate cormels at the appropriate time, label every batch, and match planting and storage conditions to the species. Allow foliage to finish its natural cycle so new corms can develop fully. A simple annual record helps identify which methods work in your climate and gradually builds a reliable supply of healthy plants.
Observe the plant after propagation rather than assuming that the first new leaf means the process is complete. A new shoot may initially use stored energy, while the root system is still developing. Maintain stable conditions and avoid moving the plant repeatedly. Gradual establishment is more reliable than trying to accelerate growth with heavy feeding or frequent disturbance.
Keep propagation records for each batch. Write down the plant name, parent source, date, method, growing medium, light conditions, and any problems. Note how many divisions or propagules survive and how long they take to establish. These details help you improve future attempts and identify which varieties respond best to the conditions in your garden.
Clean tools and containers between plants, especially when working with specimens that show unexplained decline. Use fresh or appropriately prepared growing medium, and keep newly propagated material separate from plants with known pest or disease problems. Good hygiene reduces avoidable losses and makes it easier to identify whether a failure is related to technique or growing conditions.
Match every step to the species. General propagation advice is a starting point, not a substitute for plant-specific requirements. Some plants tolerate disturbance and recover quickly, while others need a long rest period or specialized conditions. When a plant is rare, valuable, or unfamiliar, consult a reliable horticultural reference before cutting, dividing, or storing its propagation material.
Be patient with new plants. Root development and establishment may take longer than expected, especially when temperatures are cool or the plant is naturally slow-growing. Protect young specimens from extremes, check moisture at the root zone, and avoid unnecessary fertilizer. Once new growth is steady and the plant resists gentle movement, return gradually to its normal care routine.
For further reading, explore these related guides on soil care and plant management: How to Propagate Plants from Rhizomes: A Practical Step-by-Step Guide and How to Propagate Plants from Basal Offsets and Pups. For additional research-based recommendations, consult Virginia Cooperative Extension’s guide to propagation by cuttings, layering, and division.
Corms and similar underground structures
| Structure | How it differs | Propagation approach |
|---|---|---|
| Corm | Solid, swollen underground stem | Separate healthy cormels or offsets when the species and growth cycle allow |
| Bulb | Short stem surrounded by fleshy storage scales or leaves | Separate offsets or bulblets when sufficiently developed |
| Tuber | Swollen storage organ, often with buds or eyes | Divide only when each section has viable buds and the species tolerates it |
| Rhizome | Horizontal underground stem with nodes | Divide into sections with viable buds and roots where possible |
Related Gardening Guides
Explore these related guides for more practical ideas and planning advice:
- How to Create a Vertical Garden: Structures, Plants, and Maintenance
- How to Choose the Right Garden Style for Your Home
- How to Create a Beautiful Garden with Different Levels and Heights
Frequently Asked Questions
When should I divide or plant corms?
Timing depends on the plant species and its growth cycle. Many corms are divided during dormancy or when the growing cycle makes offsets easy to identify; follow species-specific guidance.
How do I know whether a corm is healthy?
Choose firm corms without soft, mushy, moldy, or badly damaged areas. Discard severely decayed material and use clean tools when separating healthy offsets.
Can I plant a corm upside down?
Correct orientation matters for many species. Look for the growing point or shoot and follow the planting instructions for that plant; if orientation is unclear, consult a species-specific guide.
Do newly planted corms need frequent watering?
Watering depends on the species, dormancy stage, medium, and temperature. Keep the medium appropriate for that plant and avoid leaving dormant corms in persistently wet soil.

8 thoughts on “How to Propagate Plants from Corms: Dividing, Planting, and Aftercare”