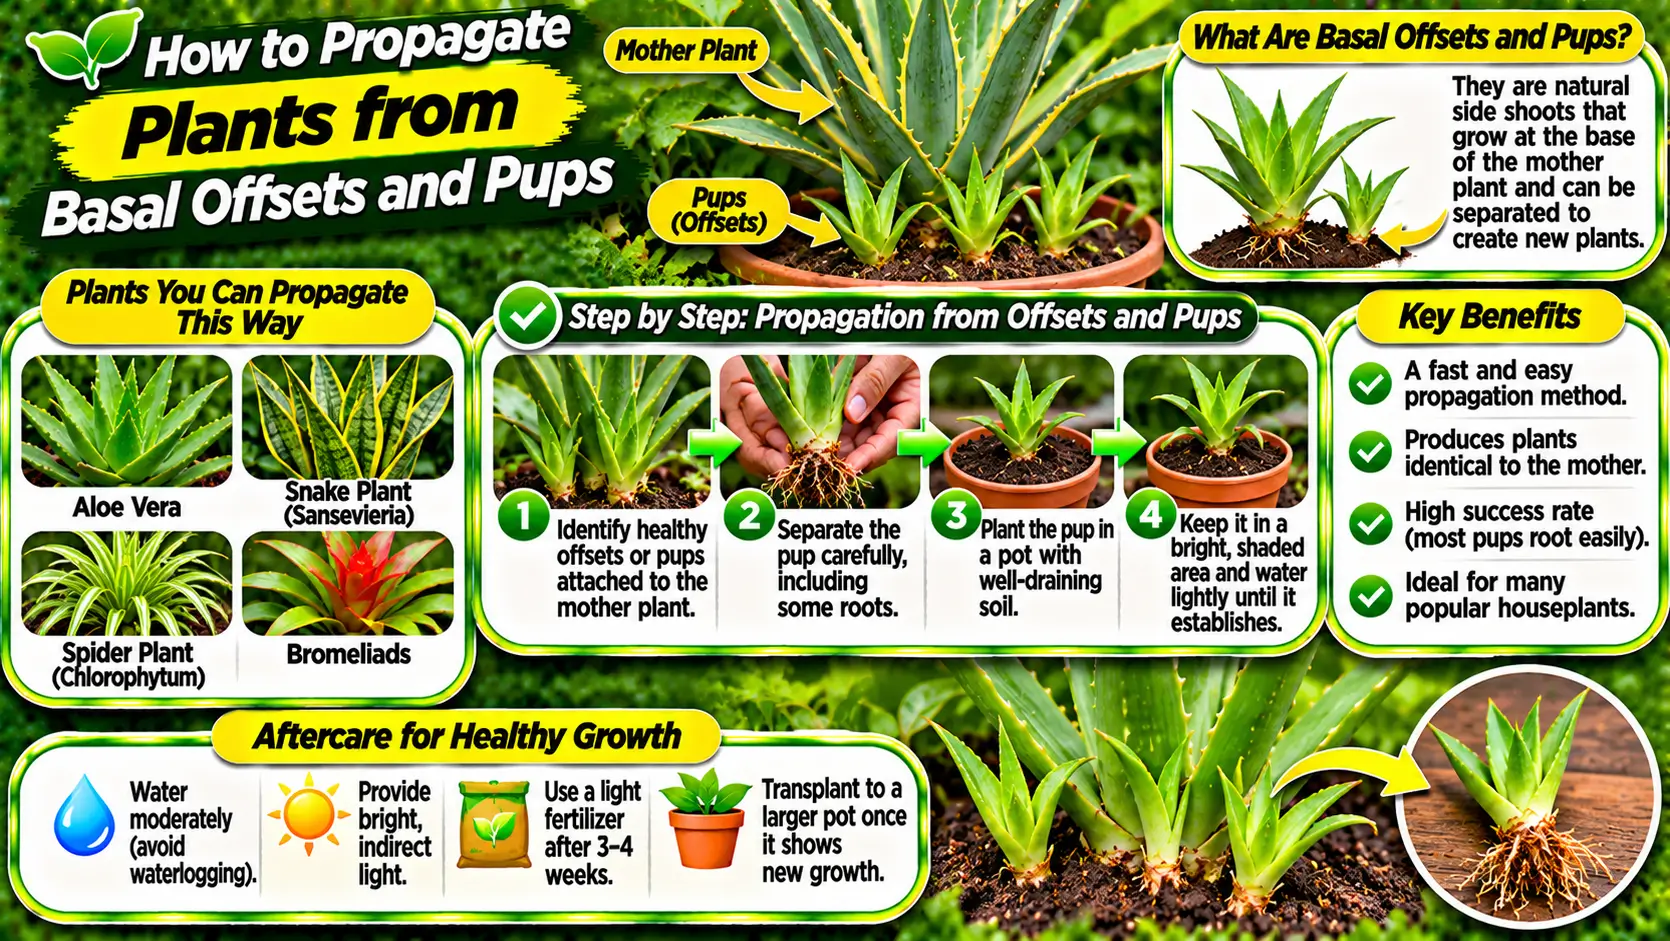
Offsets, often called pups, are small plantlets that develop at the base of a mature plant or from nearby growing points. They are common in several succulents, bromeliads, and clumping ornamentals. An offset may share a connection with the parent or develop its own roots before separation. Because it is already a small version of the parent, it can often be propagated without seed production. The correct method depends strongly on the plant group and its growth structure.
Table of Contents
- Confirming the plant’s growth habit
- Choosing the right time
- Preparing tools and containers
- Removing an offset safely
- Allowing wounds to dry when appropriate
- Planting the young offset
- Light and watering after separation
- Caring for the parent plant
- Recognizing successful establishment
- Common errors and how to avoid them
- Making propagation part of plant care
- Offsets are not all the same
- Choose separation or rooting in place
- Frequently Asked Questions
Confirming the plant’s growth habit
Before removing an offset, identify the species and learn whether it naturally forms separable pups. Some plants produce offsets that can be detached once they reach a certain size, while others should remain attached until they have their own roots. A plant that appears to have a pup may actually be producing a new leaf, flower stalk, or normal basal growth. Avoid cutting until the structure is clearly understood. Species-specific guidance helps prevent damage to the parent crown.
Choosing the right time
Offsets are generally easier to handle when the parent is actively growing and the young plant is large enough to survive independently. Avoid separation during extreme heat, cold, or drought stress. If the parent has recently been repotted, damaged, or affected by pests, allow it to recover first. Some plants have a natural seasonal growth period, and propagation during that period may improve establishment. Timing should follow the plant’s needs rather than a fixed calendar date.
Preparing tools and containers
Use a clean, sharp knife or pruning tool appropriate for the plant. Wear gloves when handling species with spines, irritating sap, or sharp leaf edges. Prepare a pot with drainage holes and a growing medium suited to the species. Succulent offsets usually need a porous mix, while other plants may require a more moisture-retentive medium. Clean the work surface and label the pot before beginning so the young plant is not left exposed while supplies are gathered.
Removing an offset safely
Expose the base gently so you can see how the offset attaches to the parent. If it has a natural joint, separate it with a clean cut that preserves as much healthy tissue as possible. Do not twist or pull forcefully, because this can tear the parent crown or crush the young plant. Keep any roots attached to the offset. If the pup is too small or lacks a viable growing point, leave it in place until it develops further.
Allowing wounds to dry when appropriate
Some succulents and plants with fleshy stems benefit from allowing a cut surface to dry and form a callus before planting. This reduces the risk of rot in a moist medium. Other plant groups should be potted promptly and kept appropriately hydrated. Do not apply the same drying period to every species. Follow guidance for the exact plant, and keep detached offsets in a shaded, clean place while preparing them for planting.
Planting the young offset
Choose a pot that comfortably fits the roots without leaving a large volume of unused wet medium. Position the offset at the correct depth, keeping its crown or growing point above the soil line when appropriate. Spread roots gently rather than folding or packing them tightly. Add medium around the base and firm it lightly. Water immediately only when suitable for the species and the condition of the cut; some succulents should be allowed to callus before their first watering.
Light and watering after separation
Place the new plant in conditions that reduce stress while it establishes. Bright indirect light is suitable for many houseplant offsets, while sun-loving species may need gradual exposure to stronger light. Water according to the plant’s requirements and the moisture level of the medium. Newly separated roots are vulnerable to both drying and rot. Avoid a strict watering schedule that ignores temperature, pot size, and substrate.
Caring for the parent plant
Inspect the parent after removal and keep the cut area clean. Do not remove many offsets at once if doing so would weaken the plant or expose a large wound. Resume normal care and monitor for discoloration, soft tissue, or signs of infection. Some parent plants produce replacement pups over time, while others grow more slowly. Patience is important; excessive cutting can reduce the plant’s vigor and future propagation potential.
Recognizing successful establishment
A healthy offset should remain firm and gradually produce new leaves or roots. Slight temporary slowing may occur after separation, but persistent shriveling, blackening, or a soft base indicates a problem. Avoid repeatedly tugging on the plant to test root growth. Look for new growth and stable leaf condition instead. Once established, gradually return it to the light, watering, and feeding routine recommended for the species.
Common errors and how to avoid them
Removing offsets too early, using dirty tools, choosing the wrong medium, burying the crown, and watering too heavily are common causes of failure. Another mistake is treating all pups alike despite differences among succulents, bromeliads, and clumping plants. Identify the plant first and adapt each step. If the parent is valuable, practice with a mature, healthy offset and leave smaller pups attached until they are better developed.
Making propagation part of plant care
Offset propagation is most successful when it follows the natural growth pattern of the plant. Select a healthy pup, separate it with minimal damage, prepare an appropriate medium, and provide careful aftercare. Keep the parent healthy and avoid removing more growth than it can spare. With good timing and clean technique, offsets can become independent plants for containers, garden beds, or sharing, while preserving the characteristics of the parent.
Build a simple record for each propagation attempt. Note the plant name, parent plant, date, method, growing medium, light conditions, and watering pattern. If a cutting or young plant fails, these details can help reveal whether the issue was timing, material quality, moisture, temperature, or handling. Records are especially useful when propagating several varieties that look similar.
Keep propagation material separate from plants that show unexplained decline. Pests and pathogens can move on leaves, stems, roots, tools, and containers. Inspect the parent before taking material, clean equipment between plants, and discard diseased pieces promptly. A clean starting point cannot guarantee success, but it removes several avoidable sources of failure.
Resist the temptation to speed up every stage with extra fertilizer or concentrated products. New roots and shoots are delicate, and high nutrient levels can damage them or encourage weak growth. Use a medium appropriate for the plant and provide the light, moisture, and temperature it needs. Change one condition at a time if you need to troubleshoot, so you can understand what actually helped.
Do not judge a new plant only by the appearance of its first leaves. It may need time to build a root system before producing vigorous top growth. Keep the medium appropriately moist, provide suitable light, and avoid repeated repotting. If the plant remains firm and gradually develops new growth, it may simply be establishing at its own pace.
Propagation is also a way to learn the growth habit of a plant. Observe where roots form, how new shoots emerge, and which conditions encourage healthy development. The method that works for one species may not work for another, even when the plants look similar. Use reliable species-specific instructions and treat each new batch as a small, carefully observed trial.
Offset readiness and aftercare guide
| Observation | What it suggests | Recommended response |
|---|---|---|
| Offset has its own roots | May be ready for separation | Detach carefully with a clean tool |
| Offset is very small or rootless | May still depend on the parent | Wait or use a species-specific rooting method |
| Fleshy cut surface | May be prone to rot if planted wet immediately | Allow callusing only when appropriate for that species |
| Soft or discolored base | Possible rot or damage | Do not propagate unhealthy tissue |
| New plant is establishing | Roots may still be developing | Provide suitable light and careful watering |
| Parent has many pups | Repeated removal may weaken it | Leave enough growth for parent recovery |
For additional guidance on offsets and division, consult Iowa State University Extension’s guide to propagating houseplants by division and offsets.
Related propagation resources:
More related guides:
Offsets are not all the same
The word offset describes a young shoot or plantlet produced near the parent, but its anatomy differs among plant groups. A bromeliad pup often develops beside the mother plant and may be removed once it is sufficiently developed. Many succulents form compact offsets at the base; some already have roots, while others need time to root after separation. Clumping perennials may produce rooted divisions with several shoots. These differences explain why one fixed size rule or aftercare routine is unreliable.
Before cutting, identify the plant and inspect the base of the pup. If roots are present, preserve them. If the species is known to root from an unrooted offset, follow its specific instructions for wound handling and medium. Allowing a cut surface to callus can be useful for some fleshy succulents, but it is not a universal step for all offsets; prolonged drying can harm plants that need moist conditions.
Choose separation or rooting in place
| Offset condition | Often suitable approach | Key caution |
|---|---|---|
| Rooted pup with several healthy leaves | Separate with roots and pot individually | Keep the crown at the correct depth |
| Unrooted succulent offset | Use the species-specific rooting method | Do not keep a fresh wound constantly wet if rot-prone |
| Bromeliad pup still very small | Leave attached while it develops | Do not remove before it can establish |
| Clumping perennial with several rooted crowns | Divide the clump into viable sections | Retain roots and growing points on each division |
Iowa State University Extension and Virginia Tech Extension describe offsets as new shoots that should generally develop their own root system before separation, while noting that some species can root after removal. Treat the plant’s growth habit—not the generic label “pup”—as the basis for the method.
Related Gardening Guides
Explore these related guides for more practical ideas and planning advice:
- How to Propagate Plants from Corms: Dividing, Planting, and Aftercare
- How to Propagate Plants from Rhizomes: A Practical Step-by-Step Guide
- How to Propagate Plants from Suckers: Identification, Removal, and Care
Frequently Asked Questions
What is the difference between a basal offset and a pup?
Both terms describe young growth produced near the base of a parent plant, though usage varies by plant group. The important point is whether the young shoot has enough roots or stored resources to establish independently.
Should an offset have roots before I separate it?
For many plants, an offset with its own roots establishes more reliably. Some species can be separated before roots develop, but they need a suitable propagation method and careful aftercare.
Can I grow an offset in the same pot as the parent?
You can leave offsets attached when the plant’s growth habit and available space allow it. Separate them when crowding, pot size, or the propagation goal makes division useful.
How long does a newly separated pup take to establish?
Establishment time varies by species, size, temperature, and root condition. Watch for stable growth rather than relying on a fixed number of days or weeks.
8 thoughts on “How to Propagate Plants from Basal Offsets and Pups”