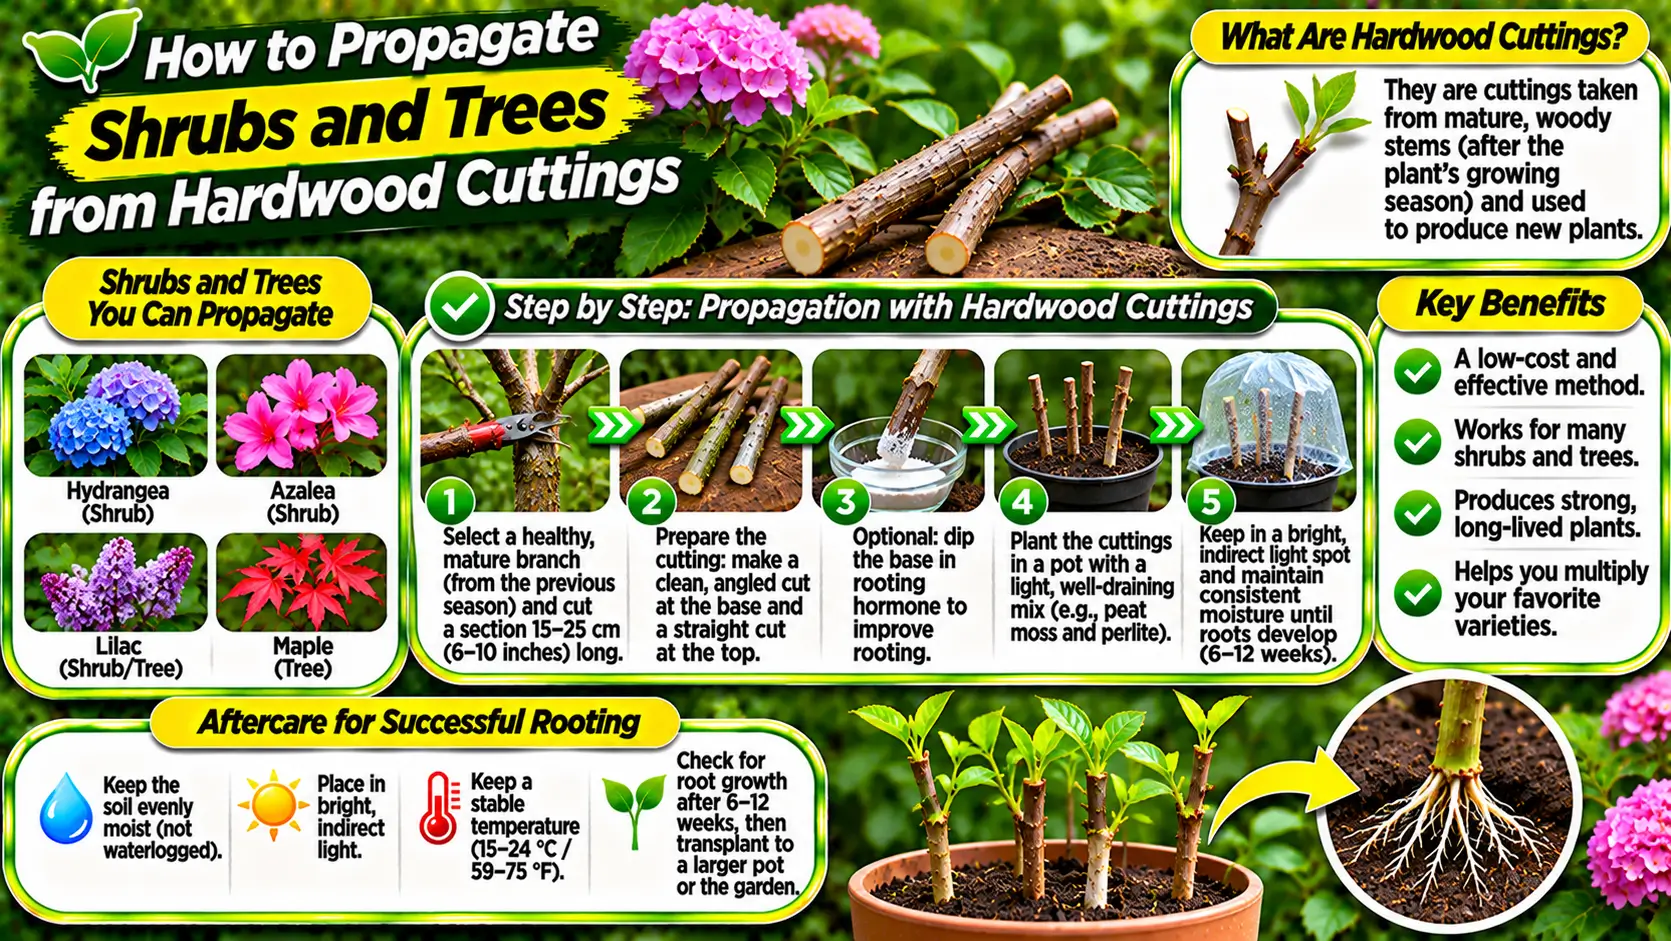
Hardwood cuttings are sections of mature, firm stems taken from many deciduous shrubs, trees, and woody climbers during dormancy or the dormant season. Unlike softwood cuttings taken from fresh spring growth, hardwood cuttings use older wood that has hardened and is no longer actively extending. The method is often slower, but it can be practical for suitable species because the stems are relatively robust and can be collected when plants are not in active leaf growth.
Table of Contents
- Choose species that root from hardwood
- Select the right stems
- Timing the collection
- Prepare clean tools and cuttings
- Prepare the rooting site
- Insert cuttings at the correct depth
- Moisture and seasonal care
- Rooting hormones and their limits
- Recognizing successful establishment
- Potting and growing on
- Troubleshooting and planning
- Hardwood cuttings need mature, dormant wood
- Hardwood cutting quality control
- Frequently Asked Questions
Choose species that root from hardwood
Willows, dogwoods, currants, gooseberries, grapes, and some other shrubs and climbers can be propagated from hardwood cuttings, though success rates differ. Many trees and shrubs do not root readily this way. Confirm the species and cultivar are suitable before collecting material. Some named cultivars may be protected by plant breeders’ rights or other propagation restrictions, so check local rules before multiplying or selling plants. Use healthy parent plants with desirable characteristics.
Select the right stems
Choose vigorous, healthy shoots from the current or recent season that have matured into firm wood. Avoid stems with disease lesions, insect damage, weak growth, or very old rough bark unless the species guidance recommends it. Pencil-thick stems are a common starting point for many plants, but the preferred diameter and length vary. Collect more cuttings than the number of finished plants required, because not every cutting will root.
Timing the collection
Hardwood cuttings are usually collected during dormancy, after leaves have fallen and before strong spring growth begins. In mild climates, the suitable period may be broader; in colder regions, frozen stems and soil can make handling difficult. Avoid collecting during severe frost or from plants under drought stress. Keep cut material cool and prevent it from drying while preparing the cuttings. If you cannot plant immediately, store it under conditions recommended for the species.
Prepare clean tools and cuttings
Use sharp, clean pruning shears or a knife to make smooth cuts. A slanted top cut can help distinguish the upper end from the base, while a straight lower cut may be made just below a bud or node depending on the method. Keep the polarity clear so the cutting is planted upright. Remove side shoots and leaves if any remain, and divide stems into sections of the recommended length. Avoid crushing the bark or splitting the wood.
Prepare the rooting site
Hardwood cuttings may be rooted in a nursery bed, a deep container, or a propagation tray depending on species and climate. The medium should drain well while retaining enough moisture to prevent desiccation. A mixture designed for propagation is often preferable to heavy garden soil in containers. Choose a sheltered location with suitable light and protection from strong wind. Prepare the bed before inserting cuttings so they are not left exposed.
Insert cuttings at the correct depth
Plant each cutting with the basal end down, following species-specific depth guidance. Several buds may remain above the medium while lower nodes are buried where roots can develop. Firm the medium gently around the stem to ensure contact without compacting it excessively. Space cuttings so leaves and shoots will not become crowded when growth begins. Label each row or container with the plant name and date.
Moisture and seasonal care
Keep the rooting medium evenly moist but not waterlogged. Dormant hardwood cuttings may show little visible activity for some time, so avoid watering too frequently simply because there is no top growth. Check the medium and adjust for rainfall, container size, and temperature. Protect containers from drying wind and extreme temperature swings. In a nursery bed, mulch may help moderate moisture, but do not bury the stems under a thick layer.
Rooting hormones and their limits
A rooting hormone may improve success for some species, but it is not required for every hardwood cutting. Use only a product labeled for the intended plant or propagation use, and follow the instructions for concentration and application. Too much hormone can injure tissue rather than improve rooting. Hormone treatment cannot compensate for unsuitable plant material, poor sanitation, waterlogged medium, or incorrect timing. Compare treated and untreated cuttings only when you can keep the other conditions similar.
Recognizing successful establishment
Bud break alone does not prove that a cutting has rooted. A stem may use stored reserves to produce leaves before it has enough roots to support them. Look for sustained growth and, when practical, gentle evidence of root development without repeatedly pulling the cutting from the medium. Some species take many months to form a useful root system. Be patient and avoid transplanting until the cutting is established enough to survive handling.
Potting and growing on
Once a cutting has a healthy root system, move it carefully into an individual container or a prepared nursery location. Use a growing medium suited to the species and avoid damaging new roots. Water after potting to settle the medium, then provide protection from extreme sun, wind, and drought while the plant adjusts. Gradually expose young plants to their final growing conditions. Keep them labeled so cultivars and species are not confused.
Troubleshooting and planning
Cuttings that turn black or soft may have rotted because of excessive moisture, poor drainage, or contaminated material. Dry, shriveled stems may have lost moisture before rooting. Failure can also result from unsuitable species, immature or overly old wood, incorrect orientation, or poorly timed collection. Record the source plant, collection date, cutting size, medium, and results. A measured approach helps refine the method and makes hardwood propagation more predictable over time.
Keep a simple propagation log with the plant name, parent plant, date, preparation method, medium, and observations. A record helps distinguish a method that consistently works from one that succeeds only occasionally. It also prevents repeating avoidable mistakes, such as using the wrong part of a stem or keeping the medium too wet. Photographing progress at regular intervals can be useful when changes are slow.
Cleanliness is important throughout propagation. Wash containers before reuse, use fresh or properly prepared growing medium, and clean cutting tools between parent plants. Remove decaying material promptly and do not allow diseased leaves or stems to remain beside healthy propagations. These habits reduce the chance that a small problem will spread through an entire tray or batch.
Do not judge success only by the appearance of the top growth. New leaves can sometimes develop using stored energy before a cutting has formed enough roots. Conversely, a healthy root system may be developing before obvious top growth appears. Follow the expected timing for the species and avoid repeatedly pulling, unwrapping, or moving propagations to check progress.
Match moisture to the plant and method. A medium that is suitable for a soft tropical cutting may be too wet for a succulent or dormant woody stem. Drainage, container size, temperature, airflow, and humidity all influence how quickly water is lost. Check the actual condition of the medium and adjust rather than following a fixed watering schedule.
Be patient and plan for some losses. Even careful propagation does not guarantee that every cutting, leaf, seed, or division will establish. Taking a modest number of extra propagations can account for normal variation, but do not remove so much material that the parent plant is weakened. Choose healthy material, use a suitable method, and give new plants time to become established.
Hardwood cutting selection guide
| Check | Suitable material or condition | Why it matters |
|---|---|---|
| Species | Choose shrubs or trees known to root from hardwood cuttings | Success varies greatly by plant |
| Stem maturity | Use healthy, dormant or mature current-season wood as advised | Overly soft growth may dehydrate or decay |
| Cutting quality | Firm stems with healthy buds and correct polarity | Supports rooting and shoot development |
| Rooting medium | Clean, well-drained medium that retains suitable moisture | Balances water and oxygen |
| Placement | Insert at the correct depth and orientation | Prevents drying and planting errors |
| Monitoring | Check moisture and new growth without repeated disturbance | Protects developing roots |
For additional guidance, consult NC State Extension handbook chapter on plant propagation.
Explore these related propagation guides:
Explore more related propagation methods:
- How to Propagate Plants from Basal Offsets and Pups
- How to Propagate Plants from Suckers: Identification, Removal, and Care
Hardwood cuttings need mature, dormant wood
Hardwood cuttings are taken from mature, firm growth after it has hardened, commonly during dormancy in deciduous shrubs and trees. The method is not suitable for every woody species; some root more reliably from softwood or semi-hardwood material, and others are difficult to propagate from cuttings at all. Confirm the recommended method for the plant before collecting. Select healthy shoots from the current or previous season as specified by the species guide, avoiding weak, diseased, frost-damaged, or flowering sections.
Keep the polarity of each cutting clear. Mark the end nearest the parent or use different cut shapes at the top and base if the method recommends it. Make clean cuts with disinfected tools, bundle cuttings by variety, and prevent them from drying during preparation. Length, number of buds, and insertion depth differ among species; fixed measurements should be treated as examples from a crop-specific protocol rather than universal standards.
Hardwood cutting quality control
| Quality check | Suitable material | Reject or review |
|---|---|---|
| Shoot condition | Firm, mature, healthy wood | Soft, shriveled, cracked, or diseased wood |
| Buds | Several sound buds retained as required | Damaged or absent growing points |
| Polarity | Top and base clearly identified | Unlabeled mixed bundles |
| Rooting bed | Well-drained, moisture-retentive medium | Compacted or waterlogged soil |
| Aftercare | Stable moisture and protection from extremes | Repeated drying or saturation |
Mississippi State University Extension describes hardwood cuttings as dormant-season material and provides crop examples and typical dimensions; its calendar months apply to its regional climate, not every country. In warm or tropical regions, use the plant’s growth cycle and local seasonal conditions instead of copying a northern-hemisphere calendar.
Related Gardening Guides
Explore these related guides for more practical ideas and planning advice:
- How to Propagate Plants from Root Cuttings
- How to Propagate Plants by Grafting: Basic Techniques and Aftercare
- How to Propagate Plants from Rhizomes: A Practical Step-by-Step Guide
Frequently Asked Questions
What are hardwood cuttings?
Hardwood cuttings are sections of mature, dormant or nearly dormant woody stems taken from suitable shrubs and trees. They are different from softwood and semi-hardwood cuttings, which use younger growth.
When should hardwood cuttings be collected?
Timing varies by species and climate, but collection is commonly done during dormancy after stems have matured. Use local propagation guidance for the correct window.
Do hardwood cuttings need rooting hormone?
Some species root without it, while others may benefit from a suitable product. Follow species-specific instructions and the product label rather than assuming it is always necessary.
How long do hardwood cuttings take to root?
Rooting can take several weeks or months depending on species, temperature, moisture, and cutting maturity. Keep conditions consistent and check for growth without repeatedly pulling the cuttings out.
One thought on “How to Propagate Shrubs and Trees from Hardwood Cuttings”