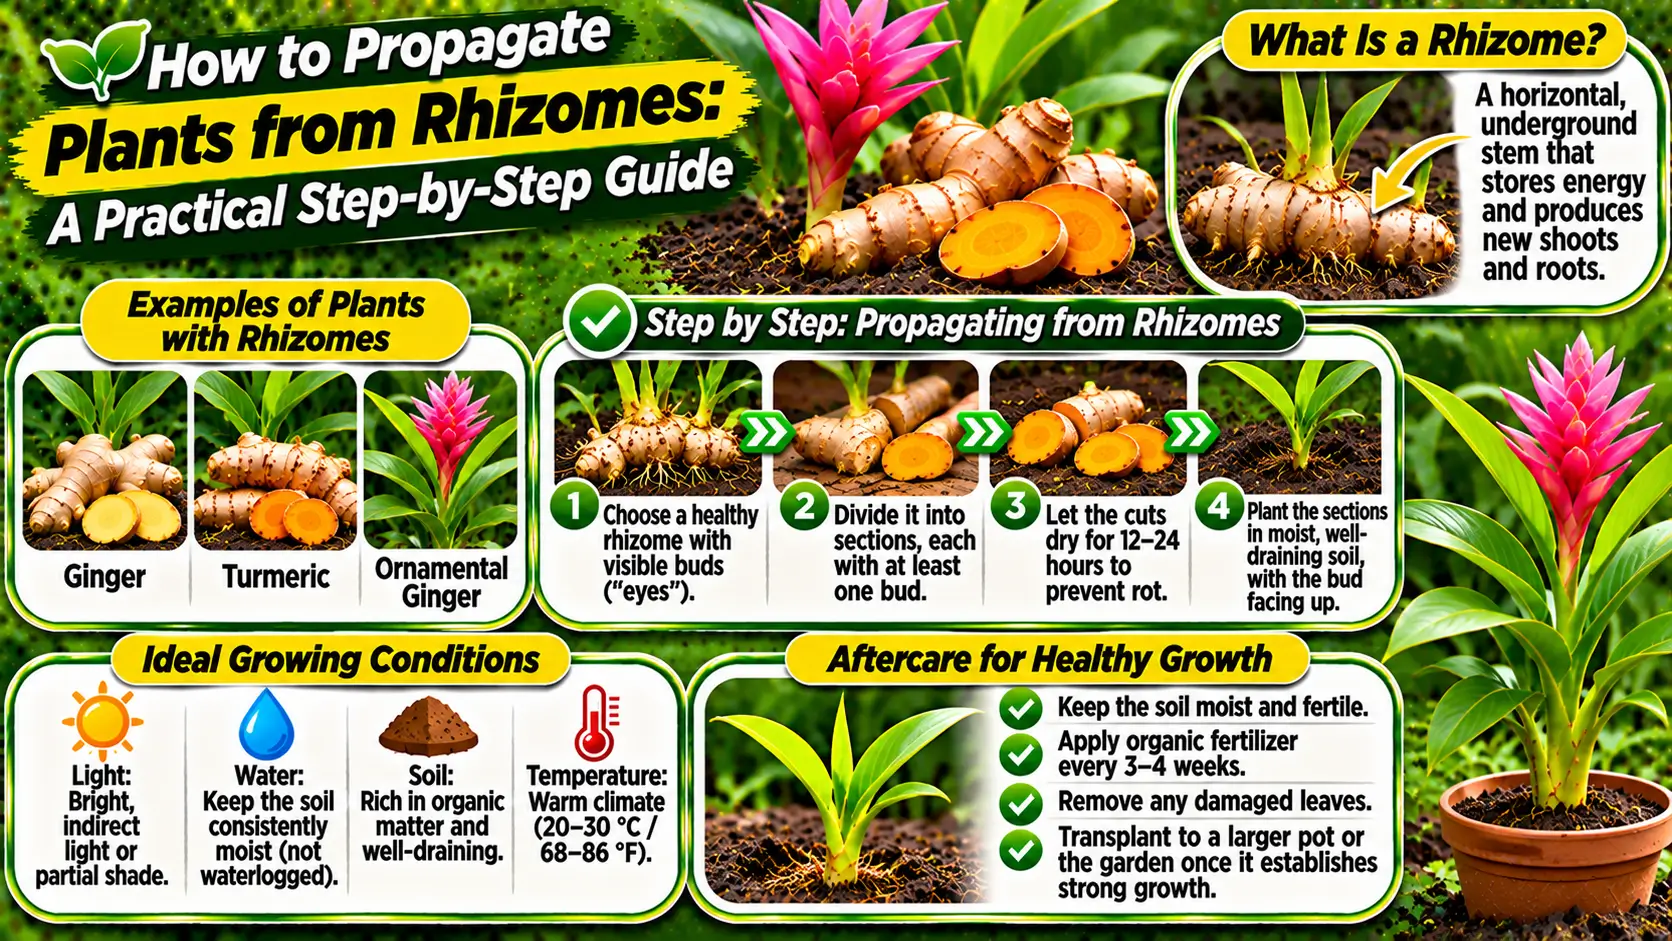
Rhizomes are modified stems that usually grow horizontally at or just below the soil surface. They store energy and produce roots, leaves, and new shoots from nodes along their length. Many familiar ornamental and edible plants spread this way, including bearded iris, ginger, some grasses, and several ground covers. Because a rhizome is a stem rather than an ordinary root, a viable piece needs suitable growth points to produce a new plant. Understanding this structure helps you divide plants without removing sections that cannot regrow.
Table of Contents
- Choosing a suitable plant
- When to divide rhizomes
- Preparing tools and the planting area
- Lifting the parent plant
- Selecting viable sections
- Replanting at the correct depth
- Watering and early aftercare
- Recognizing establishment
- Common mistakes to avoid
- Keeping the original plant healthy
- A reliable propagation routine
- Rhizome or root: how to tell the difference
- Inspect rhizome divisions before replanting
- Frequently Asked Questions
Choosing a suitable plant
Start with a healthy, established plant that has enough growth to spare. Avoid dividing specimens that are severely stressed, recently transplanted, or showing signs of disease. Check the plant’s growth habit before digging, because some rhizomes spread aggressively while others form compact clumps. Confirm that the species is commonly propagated by division and that local guidance does not restrict its movement. Select a plant with several vigorous shoots and a well-developed rhizome network so the original plant and new divisions can both recover.
When to divide rhizomes
The best season depends on the plant and local climate. Many temperate perennials are divided during a cooler period when active growth is slowing or just beginning, allowing roots to establish before heat or flowering demand. Warm-climate species may respond better when temperatures are moderate and the plant is actively growing. Avoid dividing during extreme heat, drought, waterlogging, or a period of intense flowering. Check species-specific recommendations rather than relying on a single calendar date for every rhizomatous plant.
Preparing tools and the planting area
Gather a clean spade, garden fork, sharp knife or pruning tool, gloves, labels, and containers if the divisions will be moved. Clean soil from tools and sanitize cutting surfaces using an appropriate method before beginning. Prepare the destination bed or pots in advance so exposed rhizomes are not left drying in the sun. The growing site should match the plant’s needs for light, drainage, and soil texture. Improve compacted ground before planting, but avoid adding excessive fertilizer to the planting hole.
Lifting the parent plant
Water the plant lightly beforehand if the soil is very dry, unless the species requires dry conditions. Insert a fork or spade around the outer edge of the clump and loosen the soil gradually. Lift from beneath the root-and-rhizome mass rather than pulling on the leaves or stems. Shake or brush away enough soil to see where the rhizomes branch and where active buds are located. Work carefully to preserve healthy roots and avoid snapping every connection at once.
Selecting viable sections
Look for firm, healthy rhizome sections with at least one clear growing point or bud and some attached roots where the species benefits from them. Avoid soft, hollow, discolored, or foul-smelling tissue. Use a sharp clean blade to separate sections with a deliberate cut. The ideal size varies by plant: some species establish from a short piece with a bud, while others need a larger division. Do not divide a clump into tiny pieces simply to maximize the number of plants.
Replanting at the correct depth
Plant each division at the depth recommended for that species. Some rhizomes should sit close to the surface, while others need a covering layer of soil. Incorrect depth can delay growth or cause rot. Spread roots naturally, firm the soil gently, and leave enough room for the plant to expand. If using containers, choose pots with drainage holes and a mix suited to the species. Label each division with its name and planting date, especially when several varieties are being propagated together.
Watering and early aftercare
Water after planting to settle the soil around roots, but do not leave the area saturated. Maintain even moisture while new roots establish, adjusting for rainfall, temperature, and the plant’s normal requirements. A light mulch can reduce moisture loss outdoors, but keep it away from crowns or exposed rhizomes that are susceptible to rot. Provide temporary protection from harsh afternoon sun if the plant has been moved from a shaded position. Avoid heavy feeding until new growth shows that the division is recovering.
Recognizing establishment
New shoots are encouraging, but they do not always prove that a division has developed a strong root system. Watch for steady growth, firm foliage, and resistance to gentle movement in the soil. Temporary leaf loss or reduced growth may occur after division, depending on the species and season. Remove damaged foliage with clean tools, but do not repeatedly disturb the planting to inspect roots. Give the plant time to settle and maintain conditions appropriate to its natural growth cycle.
Common mistakes to avoid
Common errors include dividing unhealthy plants, cutting sections without viable buds, leaving rhizomes exposed too long, planting too deeply, and watering continuously in poorly drained soil. Dull tools can crush tissue and create ragged wounds. Dividing at the hottest or driest time of year adds unnecessary stress. Another mistake is assuming every rhizome species behaves alike. Check the needs of the exact plant and keep divisions large enough to support recovery rather than prioritizing quantity.
Keeping the original plant healthy
After removing divisions, refill gaps around the parent plant with suitable soil and water according to its needs. Remove damaged or diseased tissue and dispose of it responsibly. Do not immediately fertilize heavily to compensate for the disturbance; excessive nutrients can encourage weak growth. Monitor the parent plant and new divisions for several weeks. If the original clump was crowded, division may improve airflow and vigor, but it still needs appropriate light, moisture, and ongoing maintenance.
A reliable propagation routine
Successful rhizome propagation depends on identifying the correct plant structure, choosing a suitable season, preserving healthy buds, and replanting at the proper depth. Prepare the site before lifting the parent, keep divisions from drying out, and monitor recovery without disturbing them repeatedly. Record the plant name, source, division date, and results. Over time, these notes help refine the timing and division size for your garden and make it easier to share healthy, correctly identified plants.
Observe the plant after propagation rather than assuming that the first new leaf means the process is complete. A new shoot may initially use stored energy, while the root system is still developing. Maintain stable conditions and avoid moving the plant repeatedly. Gradual establishment is more reliable than trying to accelerate growth with heavy feeding or frequent disturbance.
Keep propagation records for each batch. Write down the plant name, parent source, date, method, growing medium, light conditions, and any problems. Note how many divisions or propagules survive and how long they take to establish. These details help you improve future attempts and identify which varieties respond best to the conditions in your garden.
Clean tools and containers between plants, especially when working with specimens that show unexplained decline. Use fresh or appropriately prepared growing medium, and keep newly propagated material separate from plants with known pest or disease problems. Good hygiene reduces avoidable losses and makes it easier to identify whether a failure is related to technique or growing conditions.
Match every step to the species. General propagation advice is a starting point, not a substitute for plant-specific requirements. Some plants tolerate disturbance and recover quickly, while others need a long rest period or specialized conditions. When a plant is rare, valuable, or unfamiliar, consult a reliable horticultural reference before cutting, dividing, or storing its propagation material.
Be patient with new plants. Root development and establishment may take longer than expected, especially when temperatures are cool or the plant is naturally slow-growing. Protect young specimens from extremes, check moisture at the root zone, and avoid unnecessary fertilizer. Once new growth is steady and the plant resists gentle movement, return gradually to its normal care routine.
Rhizome division: selection and aftercare checklist
| Stage | What to check | Why it matters |
|---|---|---|
| Parent plant | Healthy, established, not severely stressed | Provides viable material and recovers more reliably |
| Division timing | Moderate conditions suited to the species | Reduces heat, drought, and flowering stress |
| Rhizome section | Firm tissue with a visible bud or growing point | Allows a new shoot to develop |
| Cutting tools | Sharp and clean | Limits tearing and disease transfer |
| Planting depth | Species-specific; do not bury every rhizome equally | Prevents delayed growth or rot |
| Aftercare | Even moisture, drainage, and suitable light | Supports root establishment without waterlogging |
For broader guidance on rhizomes and other vegetative methods, see the University of Florida IFAS guide to plant propagation techniques.
Related propagation resources:
Rhizome or root: how to tell the difference
A rhizome is a modified stem, usually growing horizontally at or below the soil surface. It may show nodes, scale leaves, buds, or shoots along its length. Ordinary roots absorb water and nutrients but generally do not have the stem nodes and buds needed to form a new shoot. This distinction matters when dividing: a root fragment alone is not automatically a viable rhizome division. Tubers and corms are also different storage structures and should be handled using their own species-specific instructions.
When lifting a clump, brush away enough soil to see the structure before cutting. Keep sections that contain a healthy growing point and sound tissue. Discard portions that are soft, hollow, badly shriveled, or show spreading discoloration. If the rhizome is firm but dormant, mark its orientation so that buds are not planted facing downward.
Inspect rhizome divisions before replanting
| Feature | Useful sign | Warning sign |
|---|---|---|
| Growing point | Visible bud or healthy shoot | No viable bud on a section expected to produce a shoot |
| Tissue firmness | Firm, species-typical texture | Soft, mushy, or foul-smelling tissue |
| Roots | Healthy roots retained where present | Extensive breakage or decay |
| Planting depth | Matches the species’ natural growth habit | Deep burial of a rhizome that needs surface exposure |
There is no universal planting depth for all rhizomes. Some ornamental rhizomes are planted shallowly, while others are covered more deeply; follow guidance for the exact plant. University of Florida IFAS and Mississippi State University Extension describe division as retaining sufficient stems or buds and roots for the separated portion to survive, while emphasizing that timing varies among plants.
Related Gardening Guides
Explore these related guides for more practical ideas and planning advice:
- How to Propagate Plants from Corms: Dividing, Planting, and Aftercare
- How to Propagate Plants from Basal Offsets and Pups
- How to Propagate Plants from Suckers: Identification, Removal, and Care
Frequently Asked Questions
How do I identify a rhizome before dividing a plant?
A rhizome is a horizontal stem that grows at or below the soil surface and can produce roots and shoots at nodes. Do not confuse it with a true root, bulb, or corm; the structure determines where divisions can grow.
How many buds should each rhizome division have?
Each division needs viable growing points and enough healthy tissue to support establishment. The exact requirement depends on the species, so follow plant-specific propagation guidance.
Can I divide rhizomes at any time of year?
Timing depends on the plant’s growth cycle and climate. Many species are divided during dormancy or just before active growth, while others have different seasonal requirements.
How deep should I plant a rhizome division?
Plant at the depth recommended for that species. Some rhizomes grow close to the surface, while others need more cover; planting too deeply can delay or prevent healthy shoots.
9 thoughts on “How to Propagate Plants from Rhizomes: A Practical Step-by-Step Guide”