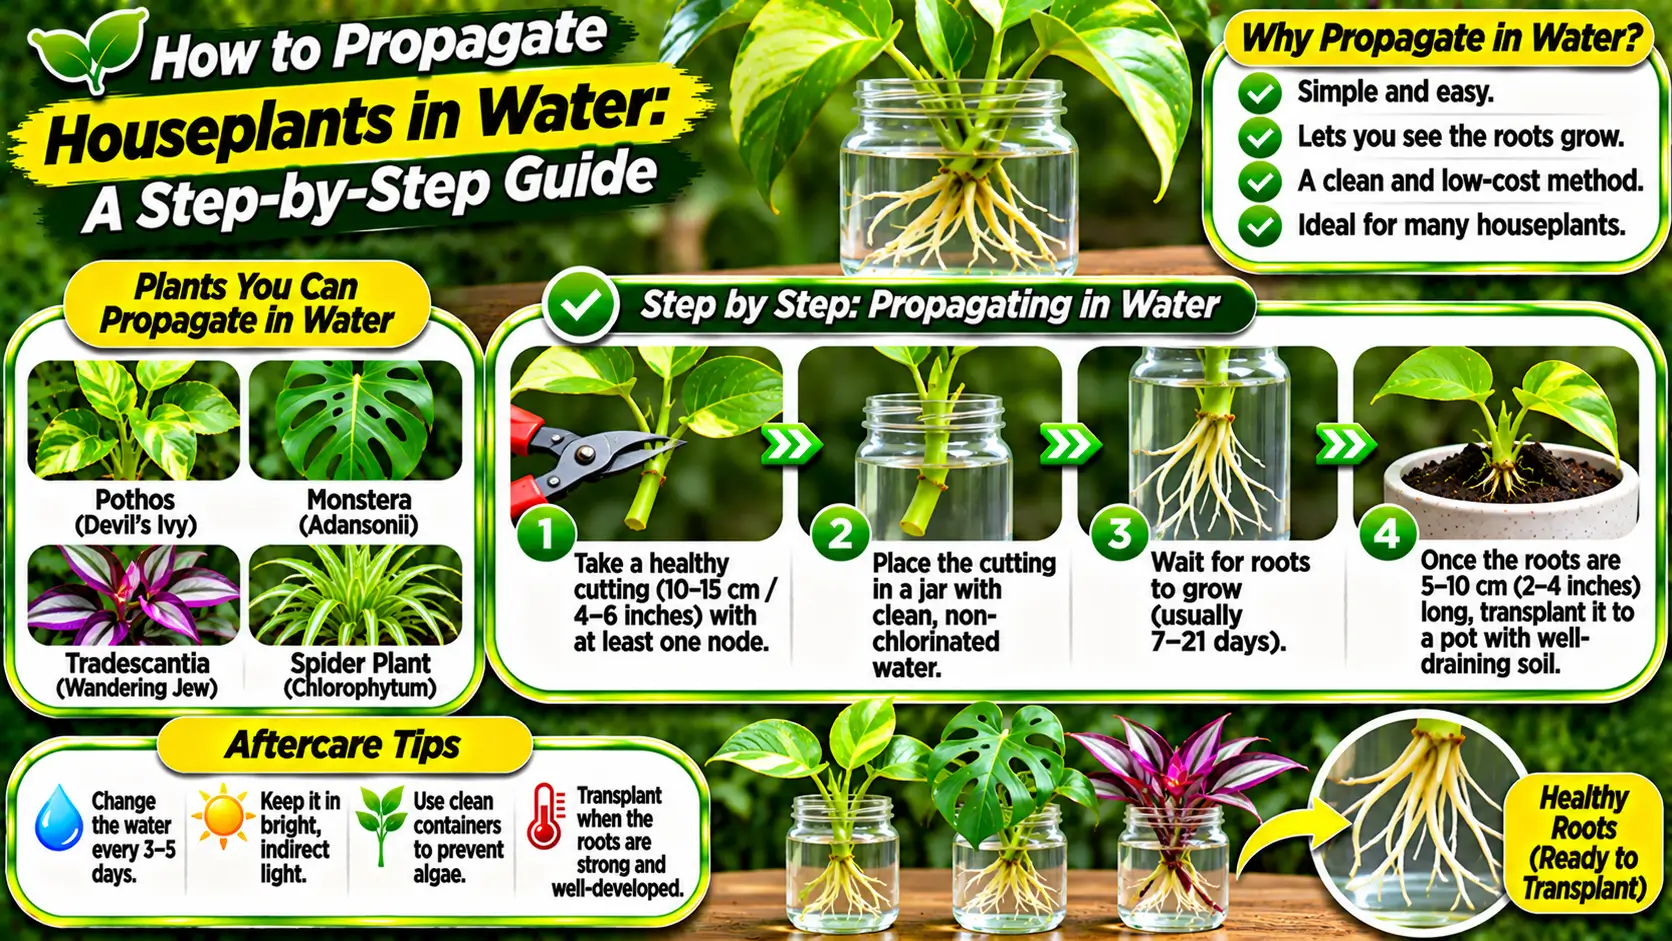
Water propagation is a simple way to encourage roots to form on a plant cutting while the base of the stem sits in water. It is popular with many common houseplants because the developing roots are easy to observe. The method is not suitable for every species, and roots formed in water may behave differently from roots produced directly in potting mix. Treat it as one propagation option rather than a universal shortcut. Success depends on choosing a suitable plant, taking a healthy cutting, and providing stable conditions.
Table of Contents
- Choosing suitable plants
- Selecting a healthy stem
- Preparing the cutting
- Choosing a container and water
- Light and temperature
- Changing and checking the water
- How long rooting takes
- Moving the cutting into potting mix
- Helping the new plant adapt
- Common mistakes to avoid
- A reliable propagation routine
- Water roots and substrate roots are not identical
- Transition from water to potting mix
- Frequently Asked Questions
Choosing suitable plants
Many vining and soft-stemmed houseplants can root in water, including pothos, heartleaf philodendron, tradescantia, and some forms of monstera. Certain herbs and ornamental plants may also root successfully. Plants with thick, woody stems, specialized root systems, or strong preferences for dry conditions may be less reliable. Check the needs of the exact species before cutting. If a plant is rare, stressed, or slow-growing, consider testing one small cutting rather than removing a large section.
Selecting a healthy stem
Choose a vigorous, disease-free stem with several healthy leaves and at least one node. A node is the point where a leaf or aerial root emerges, and it is commonly where new roots develop. Avoid stems with soft, dark, damaged, or pest-infested tissue. Use a clean, sharp blade or pruning shears to make a neat cut just below a node. A crushed or ragged cut can decay more readily and make it harder for the cutting to establish.
Preparing the cutting
Remove leaves that would sit below the waterline, because submerged foliage often breaks down and contaminates the water. Keep a few healthy leaves above the water to support photosynthesis. If the cutting is long, divide it into sections only when each section has a viable node and enough stem tissue. Do not remove every leaf unless the species and cutting type call for it. Handle the cutting gently and place it in water soon after taking it.
Choosing a container and water
Use a clean glass or container that holds the cutting upright without crushing its stem. Add enough room-temperature water to cover the node while keeping leaves above the surface. Clear glass makes roots visible, although it may encourage algae if placed in strong light. Opaque containers can reduce algae growth, but roots will be harder to inspect. Use clean tap water if it is suitable for household plants; if water quality is a concern, follow local horticultural advice.
Light and temperature
Place the container in bright, indirect light. Direct midday sun can heat the water and stress the cutting, while very low light may slow root development. Keep the cutting in a stable indoor location away from cold drafts, heaters, and sudden temperature changes. The best temperature range depends on the species, so use its normal growing requirements as a guide. A cutting that remains firm and produces new roots is generally responding better than one that becomes soft or discolored.
Changing and checking the water
Inspect the water regularly. Replace it when it becomes cloudy, develops an odor, or contains visible debris; some growers also refresh it on a routine schedule to maintain cleanliness. Rinse the container if algae or residue builds up. Keep the node submerged and avoid allowing the entire stem to sit underwater. If the base turns mushy or black, trim back to healthy tissue with a clean blade and restart in a clean container if enough viable stem remains.
How long rooting takes
Rooting time varies with species, season, temperature, light, and the condition of the cutting. Some plants produce visible roots within days or weeks, while others take longer. Do not judge progress only by calendar time. Look for firm, pale roots and signs of continued growth. Avoid repeatedly lifting or pulling the cutting to test it, because fragile new roots can break. Patience and stable conditions are usually more useful than adding unneeded products to the water.
Moving the cutting into potting mix
A cutting can be transferred once it has a healthy root system suitable for the species. Prepare a clean pot with drainage holes and an appropriate, lightly moist potting mix. Make a hole for the roots so they are not bent or crushed, position the cutting at a suitable depth, and gently firm the mix around it. Water enough to settle the medium, then allow excess water to drain. Keep the plant in bright indirect light while it adjusts.
Helping the new plant adapt
Roots formed in water may need time to adjust to the air-filled spaces and different moisture pattern of potting mix. Keep the medium evenly moist at first without leaving it saturated. Avoid strong direct sun, heavy fertilizer, or unnecessary repotting during the adjustment period. Some leaves may droop briefly, but persistent wilting, stem collapse, or blackening roots indicate a problem. Gradually return the plant to its normal care routine as new growth appears.
Common mistakes to avoid
Frequent problems include submerging leaves, using dirty containers, placing cuttings in intense sun, choosing unhealthy stems, and allowing the water to become stagnant. Another mistake is leaving a cutting in water indefinitely when the goal is a soil-grown plant. Water roots can continue growing, but the plant may need careful acclimation later. Do not assume every cutting will root; take more than one from a healthy mother plant only if removing them will not weaken it.
A reliable propagation routine
Water propagation works best when it is simple and consistent. Select a suitable species, take a clean cutting with a node, remove submerged leaves, provide bright indirect light, and keep the container clean. Watch for healthy roots rather than forcing rapid growth. Transfer the cutting when it is ready and give it time to adjust to potting mix. With careful selection and patience, this method can turn routine pruning into new plants for the home or garden.
Build a simple record for each propagation attempt. Note the plant name, parent plant, date, method, growing medium, light conditions, and watering pattern. If a cutting or young plant fails, these details can help reveal whether the issue was timing, material quality, moisture, temperature, or handling. Records are especially useful when propagating several varieties that look similar.
Keep propagation material separate from plants that show unexplained decline. Pests and pathogens can move on leaves, stems, roots, tools, and containers. Inspect the parent before taking material, clean equipment between plants, and discard diseased pieces promptly. A clean starting point cannot guarantee success, but it removes several avoidable sources of failure.
Resist the temptation to speed up every stage with extra fertilizer or concentrated products. New roots and shoots are delicate, and high nutrient levels can damage them or encourage weak growth. Use a medium appropriate for the plant and provide the light, moisture, and temperature it needs. Change one condition at a time if you need to troubleshoot, so you can understand what actually helped.
Do not judge a new plant only by the appearance of its first leaves. It may need time to build a root system before producing vigorous top growth. Keep the medium appropriately moist, provide suitable light, and avoid repeated repotting. If the plant remains firm and gradually develops new growth, it may simply be establishing at its own pace.
Propagation is also a way to learn the growth habit of a plant. Observe where roots form, how new shoots emerge, and which conditions encourage healthy development. The method that works for one species may not work for another, even when the plants look similar. Use reliable species-specific instructions and treat each new batch as a small, carefully observed trial.
Water propagation: quick reference
| Stage | Best practice | Common problem |
|---|---|---|
| Plant choice | Select species that root reliably from stem cuttings in water | Assuming every houseplant can be propagated this way |
| Cutting | Use a healthy stem and make a clean cut below a suitable node | Damaged tissue or no viable node |
| Water level | Submerge the appropriate node while keeping excess foliage out | Leaves submerged and decaying |
| Container hygiene | Use a clean vessel and refresh water as needed | Cloudy, foul-smelling water |
| Light | Provide bright indirect light for suitable species | Scorching direct sun or very low light |
| Transfer | Move to potting mix when roots are sufficiently developed | Transplant shock from abrupt changes |
For additional guidance, consult Penn State Extension guidance on propagating houseplants.
Explore these related propagation guides:
Explore more related propagation methods:
- How to Propagate Plants from Basal Offsets and Pups
- How to Propagate Plants Using Runners and Stolons
Water roots and substrate roots are not identical
Roots formed in water develop in a different environment from roots formed in an airy potting medium. A cutting that has rooted in a glass may therefore need an adjustment period after planting. Water propagation is convenient because root growth is visible, but it is not automatically faster or better for every houseplant. Some species root readily in water, while many woody or rot-prone plants are more reliable in a porous propagation medium.
Choose a stem section with a viable node or growth point; a detached leaf without the required bud tissue will not produce a new stem in species such as Monstera. Remove foliage that would sit below the waterline, keep leaves above the water, and use a clean container. Replace cloudy or foul-smelling water and inspect the stem base for softening rather than following a rigid water-change schedule that ignores actual conditions.
Transition from water to potting mix
Move a cutting when it has a healthy developing root system, not merely a tiny first root. Use a small pot with drainage and a suitable, lightly moistened mix. Set the roots gently into the medium without bending or packing them tightly. During the initial adjustment, prevent the mix from drying completely, but allow excess water to drain. Keep the plant in bright indirect light and avoid fertilizing heavily while it is adapting.
| Sign after potting | What it may indicate | What to do |
|---|---|---|
| Brief mild droop | Adjustment to a new moisture environment | Keep conditions stable and monitor the medium |
| Stem base turns soft or dark | Possible rot | Check drainage and remove decayed tissue if salvageable |
| Leaves remain limp and mix is dry | Insufficient moisture around new roots | Water thoroughly, then let excess drain |
| New leaf or sustained growth | Establishment is progressing | Resume normal species-specific care gradually |
The University of Minnesota Extension’s Monstera guide notes that water is one possible rooting medium, but also explains its limitations and the importance of nodes, drainage, and post-rooting care. Treat that as a species example, not a universal rule for every houseplant.
Related Gardening Guides
Explore these related guides for more practical ideas and planning advice:
- How to Propagate Plants from Root Cuttings
- How to Propagate Shrubs and Trees from Hardwood Cuttings
- How to Grow Plants from Seeds: A Reliable Guide from Sowing to Transplanting
Frequently Asked Questions
Which houseplants are easiest to propagate in water?
Many vining plants with healthy nodes, such as pothos, root readily in water. Success varies by species, and not every houseplant is suited to this method.
Do water-propagation cuttings need a node?
For most common stem-cutting methods, yes. A node contains the tissue needed to produce new roots and shoots; a leaf without a node generally cannot develop into a complete new plant.
How often should I change the propagation water?
Keep the water clean and refresh it when it becomes cloudy or debris accumulates. Also rinse the container as needed and maintain a suitable water level around the nodes.
When should I move a water-rooted cutting into potting mix?
Transfer it when it has developed a healthy root system that can be handled without excessive damage. Acclimate it gradually to the moisture and airflow of the potting medium.
3 thoughts on “How to Propagate Houseplants in Water: A Step-by-Step Guide”