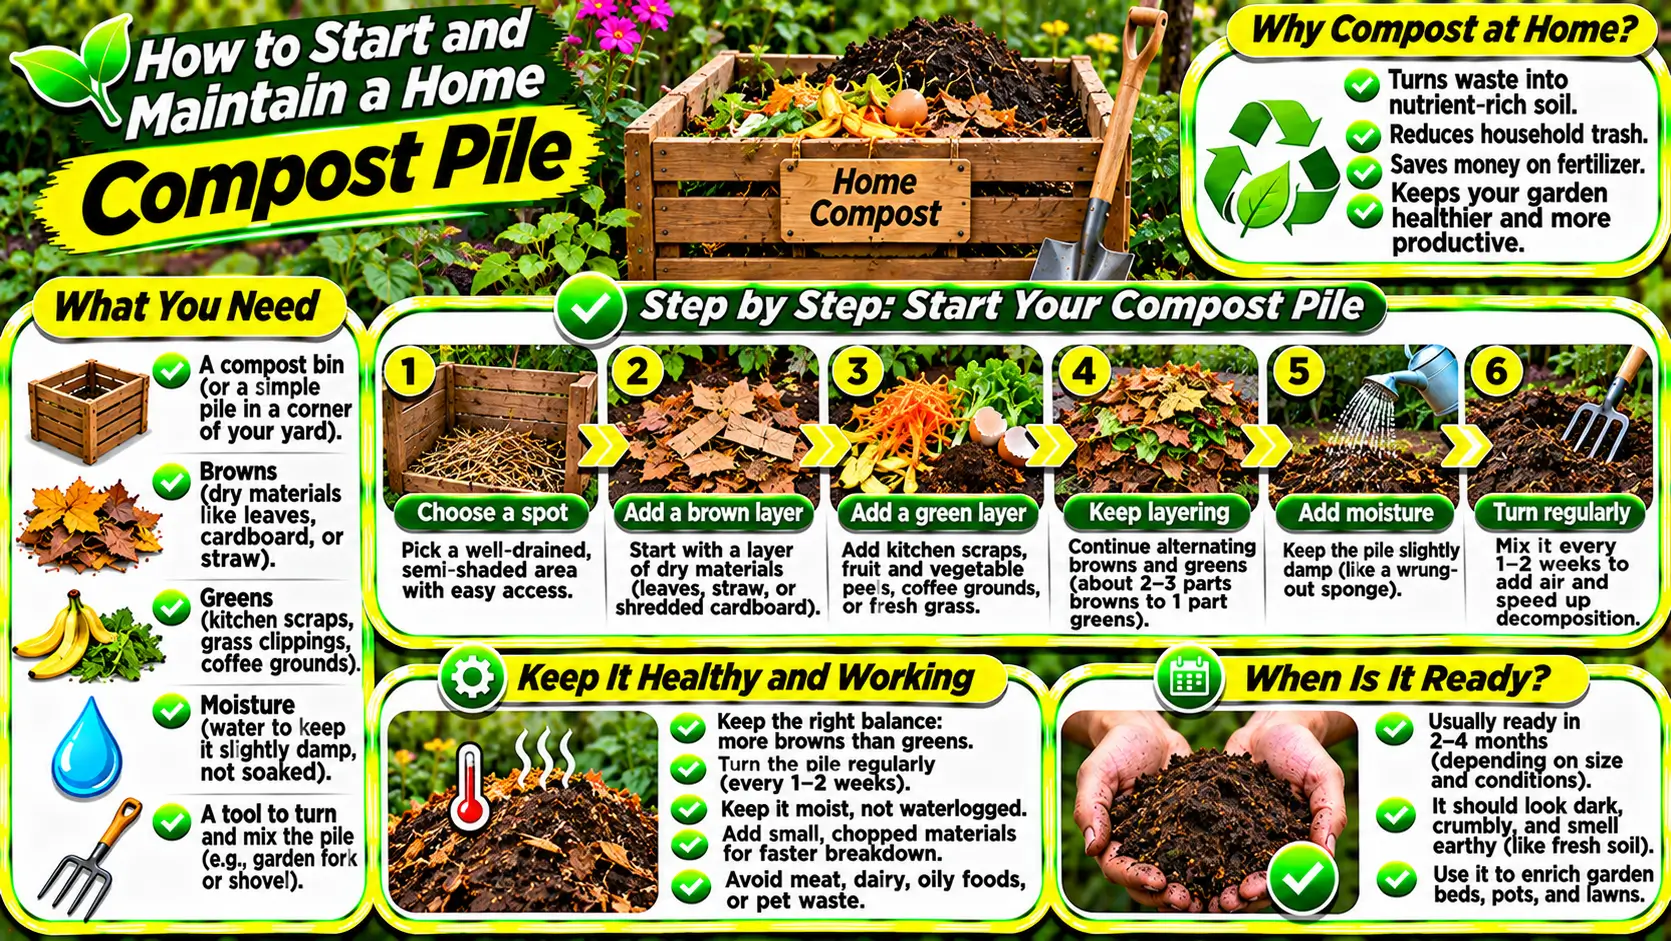
Compost that looks dark is not necessarily mature. A stable, finished material is generally dark and crumbly, has an earthy smell, no longer heats noticeably after turning, and contains few recognizable original ingredients. If the pile still smells sour or ammonia-like, heats strongly after mixing, or contains many fresh scraps, allow more decomposition and curing before using it around sensitive plants.
Be especially cautious when using homemade compost in seed-starting mixes, containers, or around young transplants. Immature compost can temporarily tie up nitrogen, release organic acids, or contain salts and other compounds that interfere with germination and root growth. Do not assume that a small backyard pile has reached pathogen- or weed-seed-killing temperatures throughout; the cooler outer layers may never receive the same treatment as the center.
Use finished compost as a soil amendment or surface mulch in moderate amounts, not as a complete replacement for garden soil or potting mix. If the source materials included manure, check local food-garden safety recommendations and allow the required treatment or waiting period. UConn Extension’s home composting guide explains moisture, odor, curing, and use. The time required varies with climate, pile size, materials, and management, so judge readiness by condition rather than a fixed number of weeks.
Related Gardening Guides
Explore these related guides for more practical ideas and gardening advice:
- Start a Home Compost Pile: Materials, Layers, and Maintenance
- Make and Use Leaf Mold for Healthier Garden Soil
- Use Compost Tea Responsibly in the Garden
Introduction
Home composting turns many plant-based kitchen and garden materials into a useful soil amendment. A well-managed pile supports decomposer organisms that break organic matter down into a darker, crumbly material. Compost can improve soil structure, support moisture retention, and contribute nutrients, although its exact composition varies with the ingredients and process. It is not a complete substitute for every fertilizer or a solution for all soil problems.The easiest compost system is one that fits the space and the amount of material a household produces. A small enclosed bin may suit a courtyard, while an open pile or larger bay can work in a spacious garden. Before starting, check local rules and choose a location with convenient access, reasonable drainage, and enough room to turn or manage the material.
Table of Contents
- Introduction
- Choose a suitable compost location
- Understand green and brown materials
- What should and should not go into compost
- Build the pile in balanced layers
- Manage moisture and airflow
- Temperature and decomposition
- Troubleshoot common compost problems
- Know when compost is ready
- Using compost in the garden
- Check compost maturity before applying it to plants
- Frequently Asked Questions
Choose a suitable compost location
Place a compost bin on reasonably level ground where excess moisture can drain and the system is accessible throughout the year. Direct sun is not essential, although it can affect how quickly a pile warms and dries. Some shade can help prevent excessive drying in hot climates. Avoid placing a bin where runoff could carry material into a storm drain or waterway.A container with ventilation openings can help keep material contained while allowing air to enter. An open pile needs enough space to manage its shape and protect it from heavy rain or animals where necessary. Keep the system a practical distance from doors and windows, and follow local guidance on pest prevention. A secure lid or cover can help deter animals without sealing the pile so tightly that airflow is lost.
Understand green and brown materials
Composting works best when a mix of nitrogen-rich and carbon-rich materials is available. Common “green” materials include vegetable scraps, fruit scraps, fresh plant trimmings, and coffee grounds. “Brown” materials include dry leaves, small amounts of untreated shredded cardboard, and dry plant stems. These labels describe their general role in the compost mix rather than their color alone.A pile containing too much wet green material may become dense, slimy, and unpleasant-smelling. Too much dry brown material can decompose slowly. Add a varied mixture and break large pieces into smaller pieces to increase the surface available to decomposers. Keep a supply of dry leaves or shredded cardboard nearby so wet additions can be balanced when needed.
What should and should not go into compost
Many fruit and vegetable scraps, coffee grounds, tea leaves without plastic components, eggshells, dry leaves, and untreated garden trimmings can be suitable for a home compost pile. Small amounts of plain cardboard may be useful if shredded and free of glossy coatings or contaminants. Check local guidance for specific materials, especially if compost will be used around edible crops.Avoid adding pet waste, meat, fish, dairy, oils, cooked foods with sauces, and diseased or invasive plant material to a basic backyard pile unless you have a system specifically designed and managed for those inputs. These materials can attract pests, create odors, or fail to break down safely. Do not add plastics, treated wood, chemical containers, or synthetic materials. When uncertain, leave the material out and use an appropriate local waste service.
Build the pile in balanced layers
Start with a coarse layer of dry stems or small twigs where the bin design allows it, helping air move through the base. Add a mixture of brown and green materials rather than creating a thick layer of one type. Cover fresh kitchen scraps with dry leaves or another suitable brown material to reduce odors and discourage flies. Continue adding material in manageable amounts.The exact ratio depends on moisture, particle size, and the materials available. A practical approach is to keep the pile visibly mixed and add dry browns whenever it becomes wet or compacted. Chop large stems and avoid compressing the pile. If you have a large volume of grass clippings, mix them with dry leaves rather than adding a thick, wet layer by itself.
Manage moisture and airflow
A compost pile should feel like a wrung-out sponge: moist but not dripping. If the material is dusty and dry, add water gradually while mixing. If it is soggy, add dry browns and improve drainage and airflow. A strong sour or rotten smell often indicates poor oxygen conditions or excess moisture. Turning or loosening the pile can help air enter, but correct the underlying moisture balance as well.Air is needed by many of the organisms involved in ordinary aerobic composting. Turning the pile periodically can redistribute materials and bring oxygen into compacted areas. A small bin may need less frequent turning than a large active pile, depending on its design and inputs. Avoid turning excessively if the pile is already balanced and decomposing well. The goal is a stable environment, not constant disturbance.
Temperature and decomposition
A sufficiently large and well-balanced pile may warm as microorganisms break down organic matter. Heat can speed decomposition and, under appropriate managed conditions, reduce some weed seeds and pathogens. However, a small home pile may never reach or maintain temperatures needed for reliable sanitation. Do not assume that all seeds or disease organisms are destroyed simply because the center feels warm.If rapid hot composting is important, use a thermometer and follow a recognized composting method with appropriate turning and temperature monitoring. Otherwise, treat the pile as a slower process and avoid adding diseased plants, persistent weeds, or materials that require high-temperature treatment. Time, particle size, moisture, and airflow all affect the final result.
Troubleshoot common compost problems
A rotten smell usually points to excess moisture, compaction, or too much nitrogen-rich material. Add dry browns, loosen the pile, and check drainage. If the pile is dry and inactive, add water and fresh green material in moderation, then mix. If flies gather around kitchen scraps, bury the scraps within the pile and cover them with dry material. If rodents or other animals are attracted, stop adding foods that draw them and use a secure bin.Slow decomposition may result from large pieces, cold weather, insufficient moisture, or a pile that is too small to retain heat. Chop materials more finely, adjust moisture, and give the process time. A pile does not need to heat dramatically to produce compost, but a cool pile will generally take longer. If persistent odors or pests continue, review the materials being added and the system’s location and design.
Know when compost is ready
Finished compost is usually dark, crumbly, and earthy-smelling, with few recognizable original ingredients. Some woody pieces may remain and can be screened out or returned to a new pile. The time required varies widely with climate, material size, pile management, and system design. Do not use unfinished material as though it were mature compost, especially around sensitive seedlings; active decomposition can temporarily affect nutrient availability and may compete for nitrogen.Allow compost to cure after the main decomposition phase. This resting period helps the material stabilize. If the batch contains questionable inputs or persistent weed seeds, do not use it in sensitive planting areas. Use a screen if you want a finer texture for potting or top-dressing, but remember that homemade compost is variable and may not be suitable as the sole medium for containers.
Using compost in the garden
Spread mature compost as a surface amendment around established beds or incorporate modest amounts into suitable planting areas. It can improve soil structure and add organic matter, but more is not always better. Some plants prefer low-fertility or sharply drained conditions and may not benefit from heavy compost applications. Avoid piling compost against stems and tree trunks.For containers, use compost as one component of a formulated potting mix rather than filling pots entirely with homemade material. Container media need predictable drainage, aeration, and structure. If you grow edible crops, use compost made from appropriate inputs and follow local food-safety guidance. Keep records of what went into each batch so you understand the material being applied.
Conclusion
A home compost pile can turn suitable kitchen and garden scraps into a valuable soil amendment when materials, moisture, and airflow are balanced. Choose a practical location and bin, mix green and brown ingredients, avoid unsuitable waste, and adjust the pile when it becomes too wet, dry, compacted, or odorous.Be patient: composting speed varies, and a small home system may not achieve the temperatures of a managed commercial process. Use only mature, appropriate compost in the garden. With a simple routine, composting can reduce organic waste and support healthier soil over time.
Compost pile materials and troubleshooting
| Material or condition | Role in composting | Practical guidance |
|---|---|---|
| Dry leaves and shredded cardboard | Carbon-rich browns | Layer with nitrogen-rich materials |
| Vegetable scraps and fresh plant trimmings | Nitrogen-rich greens | Bury food scraps to discourage pests |
| Excess moisture | Can reduce airflow and cause odors | Add dry browns and turn the pile |
| Dry, inactive pile | Microbial activity may be limited | Add water gradually and mix materials |
| Strong unpleasant odor | Often indicates poor aeration or excess wet greens | Turn and rebalance the mix |
For more detailed guidance, consult University of Minnesota Extension home composting guidance.
Related articles:
- How to Improve Garden Soil Without Overusing Fertilizer
- Mulching a Garden: Types, Benefits, and Common Mistakes
What to compost and what to avoid
| Material | Compost suitability | Guidance |
|---|---|---|
| Dry leaves and untreated plant trimmings | Generally suitable | Shred or mix with moist materials |
| Fruit and vegetable scraps | Generally suitable in managed piles | Bury within the pile to discourage pests |
| Grass clippings | Suitable in moderation | Mix with dry browns to prevent matting |
| Meat, dairy, and oily foods | Usually avoid in basic home piles | Can attract pests and create odors |
| Diseased or pest-infested plants | Use caution | Do not add unless the process reliably reaches appropriate sanitizing conditions |
| Pet waste and treated materials | Do not add to ordinary garden compost | May introduce pathogens or contaminants |
For further practical guidance, consult University of Minnesota Extension home composting guidance.
Explore these related guides:
- How to Improve Garden Soil Without Overusing Fertilizer
- Make and Use Leaf Mold for Healthier Garden Soil
Check compost maturity before applying it to plants
Compost that looks dark is not necessarily mature. A stable, finished material is generally dark and crumbly, has an earthy smell, no longer heats noticeably after turning, and contains few recognizable original ingredients. If the pile still smells sour or ammonia-like, heats strongly after mixing, or contains many fresh scraps, allow more decomposition and curing before using it around sensitive plants.
Be especially cautious when using homemade compost in seed-starting mixes, containers, or around young transplants. Immature compost can temporarily tie up nitrogen, release organic acids, or contain salts and other compounds that interfere with germination and root growth. Do not assume that a small backyard pile has reached pathogen- or weed-seed-killing temperatures throughout; the cooler outer layers may never receive the same treatment as the center.
Use finished compost as a soil amendment or surface mulch in moderate amounts, not as a complete replacement for garden soil or potting mix. If the source materials included manure, check local food-garden safety recommendations and allow the required treatment or waiting period. UConn Extension’s home composting guide explains moisture, odor, curing, and use. The time required varies with climate, pile size, materials, and management, so judge readiness by condition rather than a fixed number of weeks.
Related Gardening Guides
Explore these related guides for more practical ideas and gardening advice:
- Start a Home Compost Pile: Materials, Layers, and Maintenance
- Make and Use Leaf Mold for Healthier Garden Soil
- Use Compost Tea Responsibly in the Garden
Frequently Asked Questions
What can I put in a basic home compost pile?
A basic pile can include a balanced mix of plant-based green materials and dry brown materials, such as vegetable scraps, leaves, and shredded untreated cardboard. Avoid meat, dairy, oils, and pet waste unless using a specialized system.
How wet should a compost pile be?
Aim for moisture similar to a wrung-out sponge. If it is soggy or smells unpleasant, add dry browns and improve airflow; if it is very dry, add water gradually.
How long does home compost take to finish?
It can take several months or longer depending on materials, particle size, moisture, temperature, and turning. Use the appearance and smell of the finished material rather than a fixed deadline.
Why is my compost pile not heating up?
A small or dry pile, insufficient nitrogen-rich material, poor moisture, or cool weather can limit heating. Check the mix and conditions before adding more material.


2 thoughts on “How to Start and Maintain a Home Compost Pile”