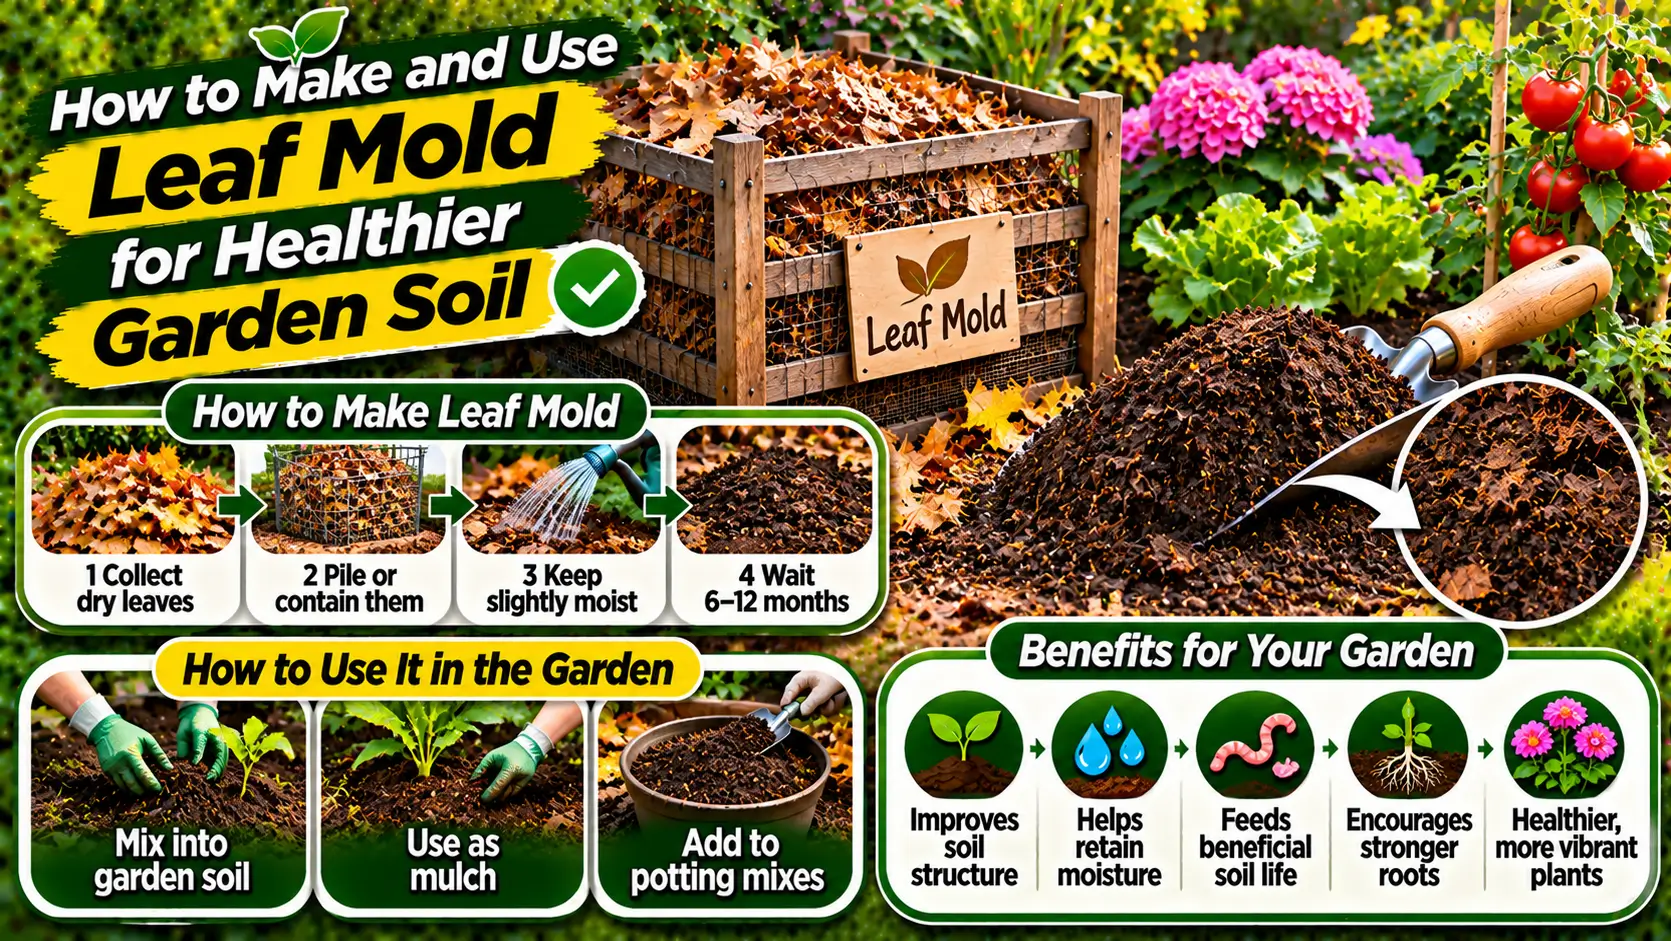
Leaf mold is a dark, crumbly material created as fallen leaves decompose, mainly through the activity of fungi and other organisms. It is different from finished mixed compost, which may contain a wider range of kitchen and garden materials and can decompose more rapidly when managed as an active pile. Leaf mold is usually made from leaves alone or mostly leaves and often takes longer to mature. It can improve soil structure and moisture handling, making it a useful resource for gardeners.
Table of Contents
- Why leaf mold is valuable
- Choosing leaves
- Preparing leaves for faster decomposition
- Choosing a storage method
- Managing moisture
- How long leaf mold takes
- Turning and maintaining the pile
- Using leaf mold as mulch
- Using leaf mold as a soil conditioner
- Leaf mold in potting mixes
- Common problems and solutions
- A simple annual leaf-mold routine
- Leaf mold is a soil conditioner, not a complete fertilizer
- Choose leaves and manage the pile
- Frequently Asked Questions
Why leaf mold is valuable
Leaf mold contributes organic matter and can help improve the physical condition of garden soil. It is particularly useful as a surface mulch and as a component in some potting or propagation mixes when mature and properly prepared. It can help sandy soils retain moisture and make some heavy soils easier to work over time. It is not a complete fertilizer, and its nutrient content is generally modest compared with nutrient-rich compost or formulated fertilizers.
Choosing leaves
Most healthy deciduous leaves can be used, although some break down more slowly than others. Soft leaves often decompose faster, while thick, waxy, or leathery leaves may take longer. Avoid leaves from plants that are diseased or heavily contaminated with pesticides, and do not collect material from roadsides where it may contain pollutants. Be cautious with leaves that are known to contain compounds that can inhibit nearby plants or are unsuitable for your intended use. When uncertain, compost them separately or seek local guidance.
Preparing leaves for faster decomposition
Shredding or chopping leaves increases the surface area available to decomposers and helps the pile settle more evenly. A lawn mower with a suitable collection system can shred dry leaves, but use care around stones and debris. Whole leaves can still make leaf mold, though they may mat together and take longer to break down. Mix different leaf types where practical, and avoid packing the material so tightly that air and water cannot move through it.
Choosing a storage method
A simple wire-mesh enclosure, breathable sack, or dedicated leaf bin can hold the material while allowing air movement. The container should be large enough to retain moisture but not so sealed that the leaves become waterlogged. A shaded or partly shaded location helps reduce rapid drying. If using bags, choose breathable garden sacks rather than tightly sealed plastic bags, unless the method is specifically designed to manage moisture and gas exchange.
Managing moisture
Leaves should remain consistently damp, similar to a wrung-out sponge, for decomposition to proceed. Dry leaves may remain almost unchanged for long periods. If the pile dries, add water gradually and mix the material so moisture reaches the center. If it becomes saturated or smells unpleasant, improve drainage and airflow and add dry leaves. Heavy rainfall can compact a pile, so a breathable cover may help protect it while still allowing air exchange.
How long leaf mold takes
Leaf mold can take many months or more than a year to mature, depending on leaf type, particle size, moisture, temperature, and how often the material is managed. Shredded leaves generally break down faster than intact leaves. Do not judge readiness by color alone. Mature leaf mold is usually dark, earthy-smelling, and crumbly, with few recognizable leaf pieces. If large intact fragments remain, allow more time or screen them out for another cycle.
Turning and maintaining the pile
Leaf mold does not need the same frequent turning as a hot compost pile. Occasional loosening can help redistribute moisture and prevent dense mats, but excessive disturbance is unnecessary. Check the pile periodically, add water when dry, and keep it protected from being blown away. If the material compacts into a wet mass, mix in drier shredded leaves and restore airflow. A simple maintenance routine is usually enough.
Using leaf mold as mulch
Spread mature leaf mold over the soil surface around suitable garden plants. It can reduce evaporation, moderate soil temperature, and protect the surface from erosion. Keep the material away from direct contact with plant crowns and woody stems. A thin, even layer is easier to manage than a thick wet mat. Replenish it as it breaks down, and avoid covering small seedlings or low-growing plants that need light.
Using leaf mold as a soil conditioner
Leaf mold can be incorporated into the upper layer of soil where appropriate, particularly in beds that need more organic matter. It may improve moisture retention in sandy soils and contribute to better structure in a range of garden soils. Use mature material and avoid digging deeply around established roots. Leaf mold should complement, not replace, other soil management practices such as crop rotation, mulching, and nutrient testing.
Leaf mold in potting mixes
Mature, screened leaf mold can be included in some homemade growing mixes to contribute organic matter and moisture retention. It should not be used as the sole potting medium because container plants also need suitable aeration, drainage, and nutrient supply. Use only clean, well-decomposed material and blend it with components appropriate for the plant. For seedlings or sensitive plants, use a reliable, clean propagation medium rather than untested material.
Common problems and solutions
A pile that remains dry needs water and better contact between leaves. A pile that smells sour is likely too wet or compacted; loosen it and add dry material. Leaves that blow away need a more secure enclosure. Slow decomposition can be improved by shredding and maintaining moisture, although some species naturally break down slowly. If mold or plant disease is suspected in the original leaves, do not use the material around susceptible plants without appropriate advice.
A simple annual leaf-mold routine
Collect suitable leaves in autumn or during seasonal leaf fall, shred them where practical, and place them in a breathable enclosure. Check moisture occasionally and loosen compacted sections. Label the collection year so older material can be used first. Once mature, screen out larger fragments and return them to a new batch. This creates a low-cost cycle that turns a seasonal garden cleanup task into a useful soil resource.
Before changing an amendment or feeding routine, consider the history of the bed or container. Repeated applications can build up nutrients even when each individual dose seems small. Keep a simple record of materials and rates, and use a soil or growing-medium test when repeated problems occur. This makes it easier to identify whether a nutrient is missing, excessive, or unavailable.
Choose materials that are appropriate for the intended plants and growing system. A product designed for a large outdoor bed may not be suitable for seedlings or small containers. Check labels, ingredient information, and local guidance. If the source or concentration is uncertain, begin with a conservative approach or select a clearly labeled product.
Water and drainage remain essential even when the nutrient plan is correct. Roots need both moisture and oxygen, and a saturated root zone can prevent healthy nutrient uptake. Check the medium below the surface, make sure containers drain freely, and avoid leaving standing water around roots. Adjust watering as temperatures, plant size, and seasonal growth change.
Do not use fertilizer as a substitute for diagnosing plant stress. Weak growth can result from insufficient light, unsuitable temperatures, pests, disease, compacted soil, or damaged roots. Inspect the whole plant and its growing environment before applying more nutrients. Correcting the actual limiting factor is usually more effective than repeated feeding.
Observe new growth over time and make adjustments gradually. Old damaged leaves may not recover even after conditions improve, so judge success by healthy new growth and stable plant performance. Avoid making several major changes at once. A measured approach protects roots, reduces waste, and helps build a sustainable soil and nutrient management routine.
For further reading, explore these related guides on soil care and plant management: How to Start a Home Compost Pile: Materials, Layers, and Maintenance and How to Improve Clay and Sandy Soil for Better Garden Growth. For additional research-based recommendations, consult Oregon State University Extension’s guide to improving garden soils with organic matter.
Leaf mold versus other soil amendments
| Material | Main role | Best use |
|---|---|---|
| Leaf mold | Adds organic matter and helps improve soil structure | Mulch or soil conditioner after decomposition |
| Finished compost | Adds organic matter and variable nutrients | Blend or top-dress garden beds according to need |
| Composted manure | Can supply organic matter and nutrients | Use cautiously based on source and soil-test results |
Leaf mold is a soil conditioner, not a complete fertilizer
Leaf mold is produced mainly through fungal decomposition of fallen leaves. Its greatest value is adding stable organic matter that can improve soil structure, surface protection, and moisture retention. It generally contributes relatively little immediately available plant nutrition, so it should not be treated as a complete fertilizer or used as the only nutrient source for demanding crops. If plants need nutrients, base that decision on crop requirements and soil-test information rather than assuming dark, crumbly material is nutrient-rich.
Choose leaves and manage the pile
- Use healthy leaves from known trees; avoid leaves contaminated with herbicides, road debris, or diseased plant material where the disease may persist.
- Shred large or leathery leaves to reduce matting and improve contact with moisture.
- Keep the pile consistently moist but not waterlogged; a dry pile decomposes slowly and a saturated pile can become oxygen-poor.
- Use a mesh bin, wire enclosure, or breathable pile that retains leaves while allowing air exchange.
- Check periodically and re-wet dry pockets; turning is optional and may speed processing but is not essential to the fungal process.
| Material | Main contribution | Best role |
|---|---|---|
| Leaf mold | Organic matter, moisture retention, soil structure | Mulch, soil conditioner, or a component of potting mixes |
| Finished compost | Organic matter and variable nutrients | Soil amendment and gradual nutrient contribution |
| Composted manure | Organic matter and potentially higher nutrient content | Use with source, maturity, food-safety, and soil-test checks |
Iowa State University Extension describes leaf mold as a fungal product that improves structure, aeration, and moisture retention more than it supplies nutrients. It notes that keeping leaves moist and shredding them can accelerate decomposition; six to twelve months or longer may be needed, depending on conditions and leaf type.
Reference: Iowa State University Extension: Composting for Home Gardeners.
Related Gardening Guides
Explore these related guides for more practical ideas and planning advice:
- How to Use Cover Crops to Protect and Improve Garden Soil
- How to Grow and Use Green Manure Crops to Improve Garden Soil
- How to Improve Clay and Sandy Soil for Better Garden Growth
Frequently Asked Questions
How long does leaf mold take to make?
It can take many months to a year or longer depending on leaf type, moisture, particle size, airflow, and how often the pile is turned. Check the material rather than relying only on a calendar.
Which leaves are best for leaf mold?
Most fallen leaves can be used, but some break down more slowly than others. Shredding tough leaves and mixing different types can help create a more consistent pile.
Does leaf mold replace compost or fertilizer?
No. Leaf mold is mainly valued for organic matter and soil structure. It generally contains fewer readily available nutrients than finished compost or a balanced fertilizer.
How do I know when leaf mold is ready?
Finished leaf mold is dark, crumbly, and has a forest-floor smell. Some recognizable leaf fragments may remain, but the material should be decomposed enough for the intended use.

4 thoughts on “How to Make and Use Leaf Mold for Healthier Garden Soil”