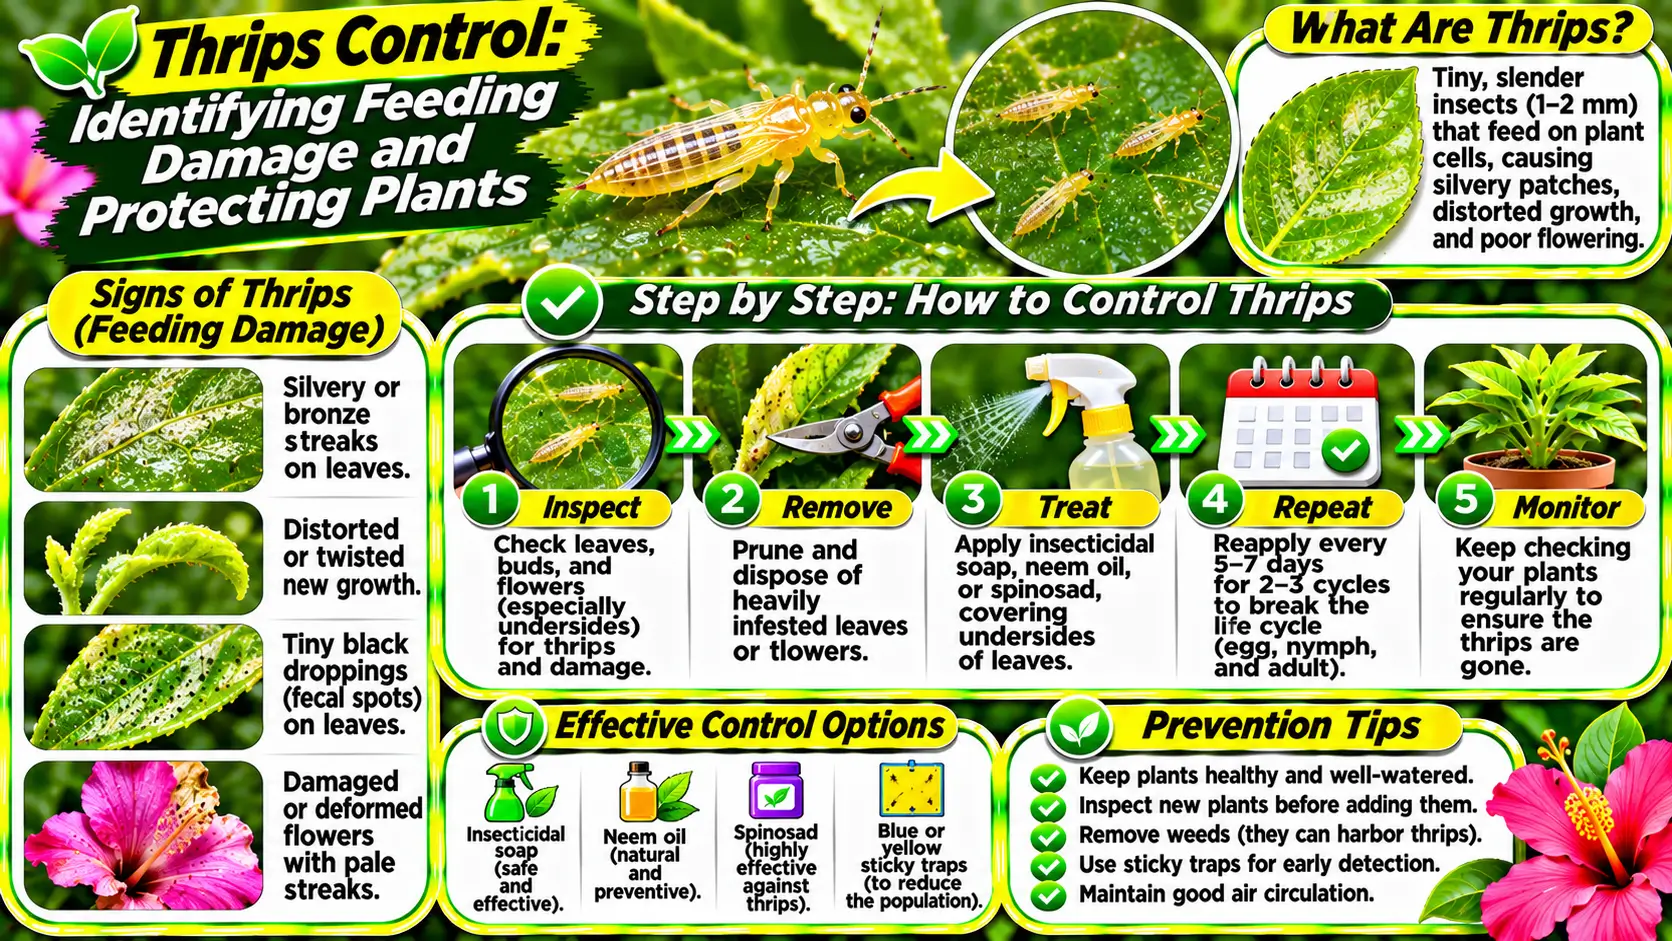
Thrips are slender, tiny insects that feed by scraping plant surfaces and consuming the contents of damaged cells. Their feeding can leave silvery streaks, pale flecks, distorted new leaves, and scarred flowers. Some species also transmit plant viruses. Because thrips hide in buds, flowers, leaf folds, and other narrow spaces, an infestation can be difficult to detect until damage is visible. Effective management combines close inspection, removal of heavily infested material, monitoring, protection of beneficial organisms, and carefully chosen treatments. Repeated checks are essential because eggs and immature stages may be protected within plant tissue or growing media.
This article focuses on thrips feeding damage, inspection of hidden feeding sites, and protecting indoor plants through quarantine and follow-up. It complements broader garden-pest guidance with particular attention to houseplant collection management.
Table of Contents
- What thrips look like
- Recognize characteristic feeding damage
- Inspect hidden feeding sites
- Use sticky cards as monitoring tools
- Reduce spread through sanitation
- Wash and prune small infestations
- Select treatments with care
- Encourage biological control
- Understand the life cycle and repeat inspections
- When to seek specialist advice
- A practical monitoring routine
- Houseplant quarantine and follow-up after a thrips find
- Frequently Asked Questions
What thrips look like
Adult thrips are narrow, elongated insects, often yellow, brown, or dark colored, with fringed wings in many species. They may be difficult to see without a hand lens. Immature thrips are smaller and usually wingless. When disturbed, they can move quickly across leaves or hide in flowers and buds. Their slender shape distinguishes them from rounder mites, although both pests can cause stippling. Tap flowers or leaves over white paper and look for tiny moving lines. A magnifier helps confirm the insect and prevents treating a plant for the wrong problem.
Recognize characteristic feeding damage
Thrips damage often appears as silvery or bronze streaks, tiny pale scars, black specks of droppings, and distorted growth. Flowers may develop brown edges, streaked petals, or fail to open normally. Young leaves can become twisted or scarred as they expand. Damage may be concentrated on tender tissue, inside buds, or along leaf veins. Some symptoms resemble sunburn, physical abrasion, or mite feeding. Look for insects and black fecal spots near fresh damage. Old scars will not disappear after treatment, so assess control by checking whether new leaves and flowers emerge without additional injury.
Inspect hidden feeding sites
Examine leaf undersides, folded leaves, growing tips, flower buds, and the inner surfaces of blossoms. Thrips often shelter where leaves overlap or petals meet. Tap a suspect flower over white paper and watch for slender insects moving across the surface. Check adjacent plants, weeds, and recently purchased flowers because thrips can arrive on new material. Indoor growers should inspect plants near open windows and outdoor plants brought inside. Record which areas are affected and whether insects are present at different times. Careful inspection is more reliable than diagnosing thrips from silvering alone.
Use sticky cards as monitoring tools
Blue or yellow sticky cards can help detect flying adult thrips and show whether activity is increasing. Place cards near the canopy at a height appropriate for the crop and check them regularly. Cards are useful for monitoring, but they do not capture every thrips and cannot reveal the number of eggs or immature insects already feeding on the plant. Avoid relying on a single card to decide whether an infestation has ended. Combine trap observations with direct leaf and flower inspections. Replace cards when dusty or full, and position them so they do not unnecessarily catch beneficial insects.
Reduce spread through sanitation
Remove badly damaged flowers, leaves, and plant debris when doing so is safe for the plant. Bag infested material and dispose of it rather than leaving it beside the growing area. Clean benches, shelves, and tools, and inspect weeds that may host thrips. Keep new plants separate until they have been checked carefully. Avoid moving infested cut flowers between rooms or placing them beside healthy houseplants. In greenhouses, remove old crop residues between cycles and clean structural surfaces. Sanitation reduces hiding places and breeding sites, although it must be paired with monitoring because thrips can remain in buds or growing media.
Wash and prune small infestations
A gentle rinse can dislodge some exposed thrips from sturdy foliage, especially when the undersides of leaves are reached. Repeat as needed and allow plants to dry in suitable conditions. Prune heavily infested flowers or tips if the plant can tolerate the loss. Avoid forceful water that damages tender growth or spreads insects to nearby plants. For houseplants, isolate the specimen during treatment and clean the surrounding area. Mechanical measures are most useful early, when only a few plants or growing tips are affected, and are less likely to solve a widespread greenhouse infestation alone.
Select treatments with care
Insecticidal soaps, horticultural oils, and other products may suppress certain thrips stages when the label lists the crop and pest. Coverage is challenging because insects hide in flowers and folded tissue. Follow label directions for application, protective equipment, and repeat intervals. Some products can damage sensitive foliage or flowers, so test a small area first. Do not use household cleaners as substitutes for labeled products, and do not increase concentration to compensate for poor coverage. Because thrips can develop resistance to some insecticides, rotate modes of action only according to professional or label guidance.
Encourage biological control
Predatory mites, minute pirate bugs, lacewing larvae, and other natural enemies can help suppress thrips in suitable settings. Biological control is most effective when pest levels are detected early and broad-spectrum insecticides are avoided. In greenhouse production, beneficial organisms may be purchased, but the correct species and release conditions depend on the crop, thrips species, temperature, and humidity. They are not a guaranteed quick fix for a severe outbreak. Preserve naturally occurring predators by limiting unnecessary pesticide use and maintaining a diverse planting environment where appropriate.
Understand the life cycle and repeat inspections
Thrips eggs may be inserted into plant tissue, while some immature stages feed on leaves and later stages may move into protected places or growing media. This means a treatment aimed only at visible adults may leave other stages untouched. The length of the life cycle varies with species and temperature. Reinspect plants at intervals suited to the conditions and any product label. Look for fresh feeding scars and live insects rather than expecting old damage to vanish. Continue monitoring neighboring plants because adults can move between hosts and cause a new round of injury.
When to seek specialist advice
Obtain local diagnostic help if damage spreads rapidly, the plant is valuable, or virus symptoms such as unusual rings, mottling, or severe distortion appear. Thrips species differ in host range and ability to transmit plant pathogens, so identification may change the recommended response. Do not move potentially infected propagation material to other locations. Follow regional pesticide rules and protect pollinators, especially when treating flowering plants. A combined plan of inspection, isolation, sanitation, monitoring, selective treatment, and beneficial insect conservation offers a more durable approach than repeated indiscriminate spraying.
A practical monitoring routine
Make pest checks part of ordinary plant care instead of waiting for obvious damage. Inspect a few representative leaves, stems, and growing points each week, increasing the frequency when conditions favor the pest or when a nearby plant is affected. Record the date, location, symptoms, and action taken. This simple record helps distinguish a treatment that is working from one that only temporarily reduces visible insects. Keep the plant’s basic needs in balance, avoid unnecessary chemical applications, and reassess the diagnosis if symptoms do not match the expected pattern.
Thrips monitoring and treatment comparison
| Action | Role in management | Practical caution |
|---|---|---|
| Visual inspection | Find feeding damage and insects | Thrips are small and may hide in buds |
| White-paper tap test | Dislodge insects for identification | Use a light background and inspect promptly |
| Sticky cards | Track flying adults | Do not rely on them alone |
| Pruning and sanitation | Remove heavily damaged plant parts | Clean tools between plants |
| Selective treatment | May reduce confirmed populations | Follow label, repeat interval, and plant safety directions |
| Beneficial insects | Can support control in suitable settings | Choose species and conditions carefully |
For additional expert recommendations, see University of Minnesota Extension information on thrips and indoor plant pests.
Related guides:
- How to Identify Scale Insects and Time Their Control
- How to Prevent and Manage Whiteflies in the Garden
Further plant health guides:
- How to Monitor and Manage Thrips on Indoor and Outdoor Plants
- How to Identify Scale Insects and Time Their Control
Houseplant quarantine and follow-up after a thrips find
When thrips are found on an indoor plant, move it away from other plants if this can be done without brushing foliage against neighboring leaves. Inspect plants that shared a windowsill, watering area, or recent delivery, even if they show no visible damage. Check the undersides of leaves, growing tips, and flowers; adults may disperse while eggs remain embedded in plant tissue. Clean the shelf or windowsill and remove fallen flowers and leaves. Keep the affected plant separate until repeated inspections show no fresh insects or feeding damage.
Plan follow-up checks rather than assuming one wash or spray has solved the problem. The interval should reflect the plant’s growth conditions, the pest’s development rate, and the repeat interval on any product label. At each check, tap suspect leaves or flowers over white paper, examine new growth, and note whether live thrips or fresh scars are appearing. Old silvering will remain visible, so judge progress by new tissue and live pest activity. If new damage continues, reconsider the identification, coverage, and whether other plants are acting as reservoirs.
For indoor collections, avoid applying outdoor-use pesticides inside the home unless the label explicitly permits that use. Do not mix products or increase concentrations. Test any labeled soap or oil on a small area of a sensitive plant first, and follow ventilation, protective-equipment, and re-entry directions. If a plant is heavily infested and difficult to isolate, discarding it may be safer than repeatedly treating an entire collection. This decision should consider the plant’s value, infestation severity, and risk to neighboring plants.
Related Gardening Guides
Explore these related guides for more practical ideas and plant-care advice:
- How to Identify and Control Thrips on Garden and Houseplants
- How to Monitor and Manage Thrips on Indoor and Outdoor Plants
- How to Prevent and Manage Whiteflies in the Garden
Frequently Asked Questions
What are the first signs of thrips on houseplants?
Look for silvery or bronze feeding scars, distorted new growth, small dark specks, and slender insects on flowers or leaf undersides. Confirm with close inspection because other pests can cause similar symptoms.
Can thrips live in potting mix?
Some thrips species or life stages may spend part of their life cycle in plant debris or growing media. Remove fallen material and identify the species before choosing sanitation or treatment steps.
Should I isolate a plant with thrips?
Yes, when practical. Move it away from other susceptible plants and inspect nearby foliage to reduce the chance of spread.
How long should I monitor a plant after treatment?
Continue checking new growth and leaf undersides over several weeks. The timing depends on the species and conditions, and repeat any treatment only as directed by its label.


2 thoughts on “Thrips Control: Identifying Feeding Damage and Protecting Plants”