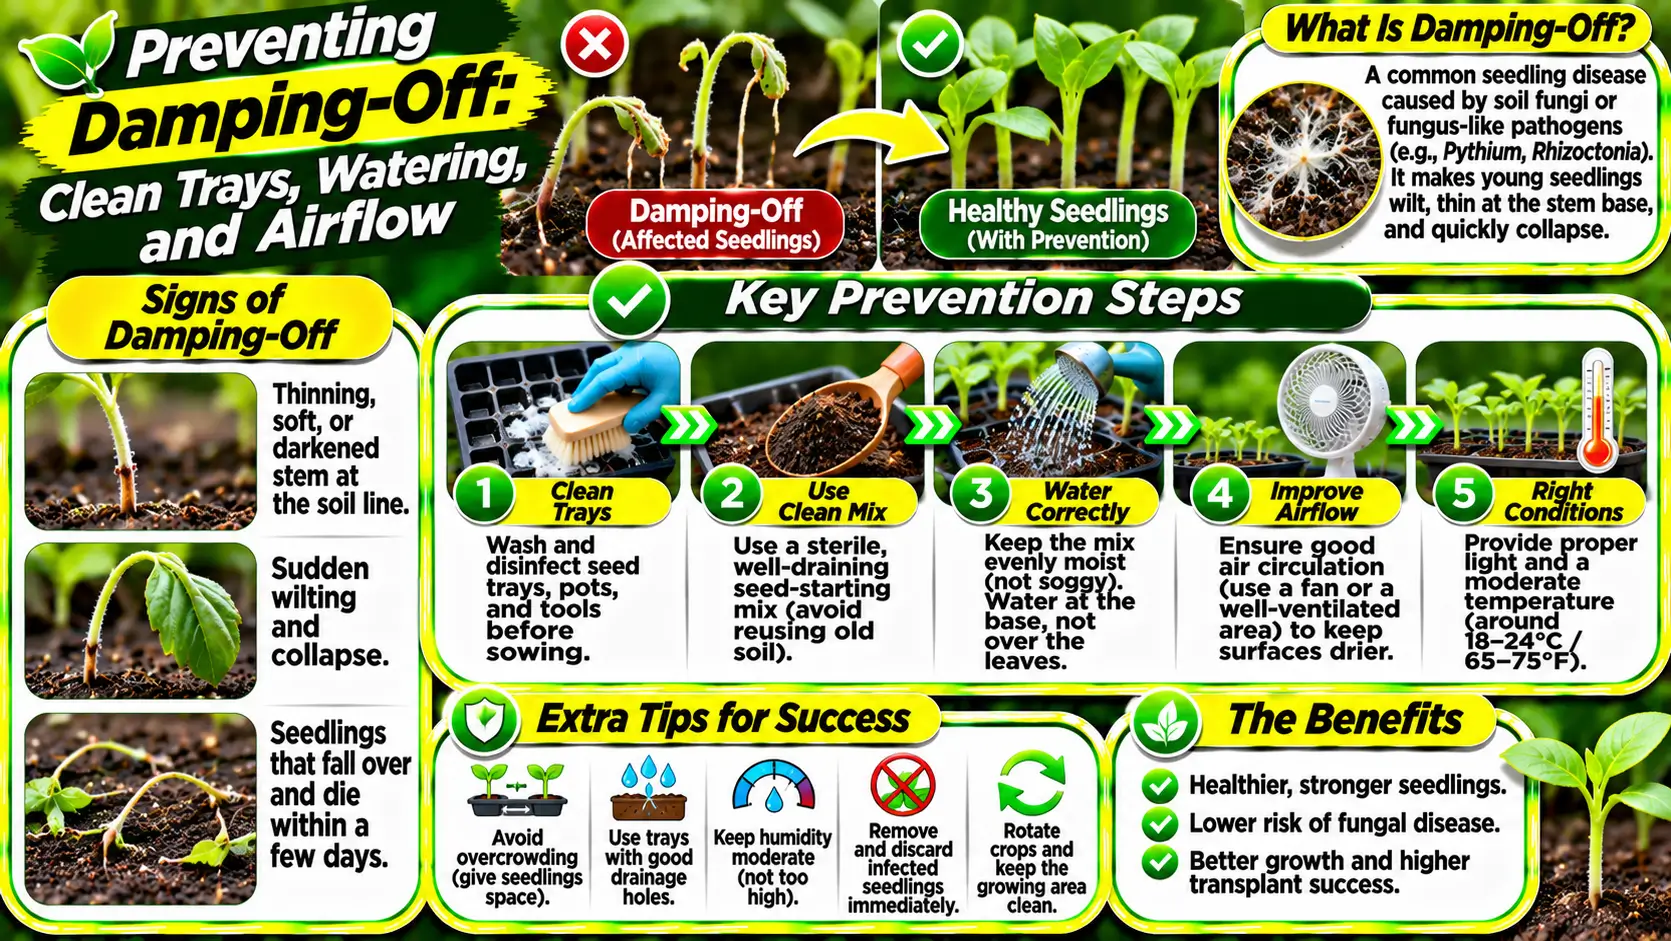
Damping-off is a destructive problem in seed-starting trays and young transplants. Seeds may rot before emergence, or newly emerged seedlings may develop thin, water-soaked stems and collapse at the soil line. Several soilborne organisms can cause these symptoms, including water molds and fungi. The disease is favored by conditions that keep growing media wet, cool, poorly aerated, or contaminated. Once a seedling has collapsed, it rarely recovers. Prevention is therefore the central strategy: use clean materials, suitable media, careful watering, adequate airflow, and conditions that encourage fast, steady seedling growth.
This article is a practical prevention guide for seed-starting trays, with emphasis on cleaning and sanitizing containers, managing moisture, and maintaining light and airflow. Its focus is the propagation routine that reduces risk before the next sowing.
Table of Contents
- Recognize the two common forms
- Why young seedlings are vulnerable
- Start with clean containers and tools
- Choose an appropriate seed-starting medium
- Water carefully and consistently
- Provide warmth and light suited to the crop
- Improve spacing and airflow
- Remove affected seedlings promptly
- Use seed treatments and biological products thoughtfully
- Build a repeatable seed-starting routine
- A practical monitoring routine
- A tray-level risk audit for the next sowing
- Clean, sanitize, and reuse seed trays safely
- Frequently Asked Questions
Recognize the two common forms
Pre-emergence damping-off occurs when a seed or emerging shoot rots before it reaches the surface, leaving gaps in a tray where seeds were planted. Post-emergence damping-off affects seedlings that have already appeared. The stem near the growing medium may become narrow, soft, dark, or water-soaked, and the plant then falls over. Roots may also look brown or decayed. Not every missing seed is diseased; poor germination, old seed, planting depth, and temperature can cause similar results. Compare affected cells with healthy ones and look for the characteristic collapse at the soil line.
Why young seedlings are vulnerable
Seedlings have small root systems and limited reserves, so they cannot tolerate prolonged stress. Their stems and roots are also easily damaged by pathogens present in contaminated media, containers, tools, or water. Dense sowing creates a humid canopy and makes it difficult for air to move around stems. Slow germination and slow growth extend the time seeds and seedlings remain vulnerable. A combination of high moisture, low oxygen around roots, and poor airflow often creates favorable conditions. Prevention works best when several small risks are addressed together rather than relying on one product.
Start with clean containers and tools
Wash reused trays, pots, cell inserts, and labels to remove old growing medium and plant debris. If containers previously held diseased seedlings, sanitize them using a method suitable for the material and follow the product instructions. Rinse when required and allow containers to dry. Clean seed-starting tools and work surfaces before beginning a new batch. Do not reuse contaminated potting medium from failed trays. A clean container does not guarantee a disease-free crop, but it reduces one avoidable source of inoculum and makes other preventive steps more effective.
Choose an appropriate seed-starting medium
Use a fresh, well-drained seed-starting mix formulated for propagation rather than dense garden soil. Garden soil can compact in small containers, drain poorly, and carry organisms that cause seedling diseases. The medium should hold enough moisture for germination while retaining air spaces around roots. Avoid filling trays with a mix that is already waterlogged or packed tightly. Follow the product’s storage instructions and keep unused medium protected from contamination. If a mix has an unusual odor, visible mold growth, or has been stored wet and exposed, choose a fresh product instead.
Water carefully and consistently
The surface should remain appropriately moist during germination, but containers should not sit in standing water for long periods. Water from below when suitable, allowing the medium to absorb moisture before draining excess water from the tray. If watering from above, use a gentle stream that does not displace seeds or keep stems constantly wet. Check moisture by feeling the medium rather than following a rigid daily schedule. Small cells can dry quickly, but overwatering is equally harmful. Empty catch trays after watering and ensure drainage holes are not blocked.
Provide warmth and light suited to the crop
Different seeds have different germination temperature requirements. Use reliable crop-specific guidance rather than assuming warmer is always better. A heat mat with a thermostat can help where appropriate, but remove or adjust it after germination if seedlings need cooler conditions. Once seedlings emerge, provide enough light to prevent weak, stretched growth. Insufficient light produces long, thin stems that are more likely to fall over and are harder to manage. Keep lights at the recommended distance and adjust them as plants grow, avoiding excessive heat at the foliage.
Improve spacing and airflow
Sow seeds at the recommended spacing and thin crowded seedlings promptly. Remove humidity domes after most seeds have emerged or when the crop guidance indicates they should come off. Use a small fan to create gentle air movement without blasting delicate seedlings. Good airflow helps foliage and the medium surface dry more evenly. Avoid placing trays in stagnant corners or against cold, damp surfaces. Air movement cannot compensate for saturated media, but it supports a healthier environment and reduces the prolonged humidity that often accompanies damping-off outbreaks.
Remove affected seedlings promptly
At the first sign of collapse, remove the affected seedling and the surrounding plug or small amount of medium if practical. Do not transplant a collapsed seedling in the hope that it will recover. Isolate the tray from healthy starts and avoid splashing water between cells. Clean tools and wash hands after handling affected material. If many cells are involved, it may be safer to discard the batch and thoroughly clean the equipment before restarting. Record the conditions that preceded the outbreak so the next sowing can be adjusted.
Use seed treatments and biological products thoughtfully
Some seeds are commercially treated, and certain biological or fungicidal products are labeled for specific seedling diseases and crops. These products are not interchangeable, and they do not replace sanitation, drainage, and careful watering. Read labels to confirm that the crop, application method, and target organism are covered. Do not apply household disinfectants or unregistered chemicals to seeds or growing media. If damping-off repeatedly affects a valuable crop, seek local extension advice about the likely pathogen and appropriate preventive options. Avoid treating every tray automatically when good cultural practices are sufficient.
Build a repeatable seed-starting routine
Before each sowing, clean the workspace, check container drainage, prepare fresh medium, and label the crop and date. Sow at the recommended depth and spacing, then monitor moisture and temperature daily. After emergence, adjust light, airflow, and humidity rather than leaving the tray in germination conditions indefinitely. Keep new seedlings separate from older plants that may carry pests or disease. Review failures honestly: note whether the medium stayed wet, the tray was crowded, or light was inadequate. A consistent routine makes problems easier to identify and prevents many damping-off losses before they begin.
A practical monitoring routine
Make pest checks part of ordinary plant care instead of waiting for obvious damage. Inspect a few representative leaves, stems, and growing points each week, increasing the frequency when conditions favor the pest or when a nearby plant is affected. Record the date, location, symptoms, and action taken. This simple record helps distinguish a treatment that is working from one that only temporarily reduces visible insects. Keep the plant’s basic needs in balance, avoid unnecessary chemical applications, and reassess the diagnosis if symptoms do not match the expected pattern.
Seedling damping-off prevention table
| Factor | Preventive practice | Risk reduced |
|---|---|---|
| Containers | Clean and sanitize trays and pots | Pathogens carried over from previous sowings |
| Growing medium | Use fresh, clean, well-drained seed-starting mix | Contaminated or compacted soil |
| Watering | Keep medium moist but not saturated | Excessive wetness |
| Spacing | Avoid dense sowing and thin seedlings | Poor airflow and prolonged humidity |
| Temperature | Use suitable germination temperatures | Slow emergence in cold, wet conditions |
| Infected seedlings | Remove and discard promptly | Spread to neighboring seedlings |
For additional expert recommendations, see UC Integrated Pest Management recommendations for damping-off.
Related guides:
- How to Grow Plants from Seeds: A Reliable Guide from Sowing to Transplanting
- Thrips Control: Identifying Feeding Damage and Protecting Plants
A tray-level risk audit for the next sowing
When a tray develops damping-off, review the whole propagation process rather than changing only the watering schedule. Record the crop, seed lot, sowing date, medium, tray history, temperature, and how water was applied. If losses are concentrated in reused containers, investigate cleaning and sanitation. If they occur in the wettest cells or where water collects, examine drainage and irrigation uniformity. If seedlings are crowded, improve spacing and air movement before the next sowing.
| Pattern in the tray | Possible process weakness | Adjustment to test |
|---|---|---|
| Losses clustered in low or saturated cells | Uneven drainage or excessive watering | Level trays, clear drainage holes, and reduce persistent saturation |
| Repeated problems in reused trays | Residual contaminated debris | Wash first, then sanitize with a suitable labeled method |
| Dense patches of collapsed seedlings | Overcrowding and poor airflow | Sow more thinly and thin promptly |
| Slow, weak emergence across the tray | Temperature, seed quality, or sowing depth issue | Check species-specific germination requirements before assuming disease |
Keep a small comparison record for the next sowing: change one major factor at a time where practical, and compare emergence and survival with the previous batch. This will not identify the pathogen, but it can reveal which parts of the propagation system are increasing risk. For guidance on diagnosing seedling diseases and prevention, see University of Minnesota Extension’s seed-starting guidance.
Clean, sanitize, and reuse seed trays safely
Cleaning and sanitizing are not the same step. Cleaning removes potting mix, roots, algae, and other organic debris; sanitizing then reduces many disease organisms on the surface. Disinfectant applied over visible soil residue may not work as intended. Empty trays completely, scrub corners and cell openings, rinse away loosened debris, and only then use a suitable sanitizer according to its label and contact time. Let containers dry and store them where soil, splash, and used tools cannot recontaminate them.
Discard cracked, deeply scratched, or porous containers that cannot be cleaned reliably. Do not mix bleach with acids, ammonia, or other cleaners, and do not assume a household concentration is appropriate for every material. If a product label specifies dilution, contact time, ventilation, and rinsing, follow those instructions exactly. Use fresh seed-starting medium for each sowing; sanitizing a tray does not make previously used growing mix safe.
UMN Extension identifies reused, poorly cleaned trays, tools, and media as possible sources of damping-off organisms and recommends clean containers and new potting mix. Review its seedling damping-off prevention guidance. For an international audience, the exact sanitizer and permitted use should follow local product labels and material compatibility rather than a single universal recipe.
Related Gardening Guides
Explore these related guides for more practical ideas and plant-care advice:
- How to Prevent and Manage Damping-Off in Seedlings
- How to Prevent and Manage Damping-Off in Seedlings
- Bacterial Leaf Spot: Symptoms, Causes, and Plant Care
Frequently Asked Questions
Can damping-off affect seeds before they emerge?
Yes. Some pathogens cause seeds or newly germinated seedlings to rot before they appear above the growing medium, resulting in poor or uneven emergence.
Is damping-off caused by one fungus?
No. It is a disease complex involving several soilborne organisms. The symptoms can look similar even when different pathogens or conditions are involved.
Can I reuse trays after damping-off?
Only after thorough cleaning and appropriate disinfection. Discard contaminated growing medium and remove plant debris before starting a new batch.
Does bottom watering prevent damping-off?
Bottom watering can reduce leaf wetness and water splash, but it does not eliminate the disease risk. Clean equipment, fresh medium, suitable moisture, spacing, and airflow remain important.

