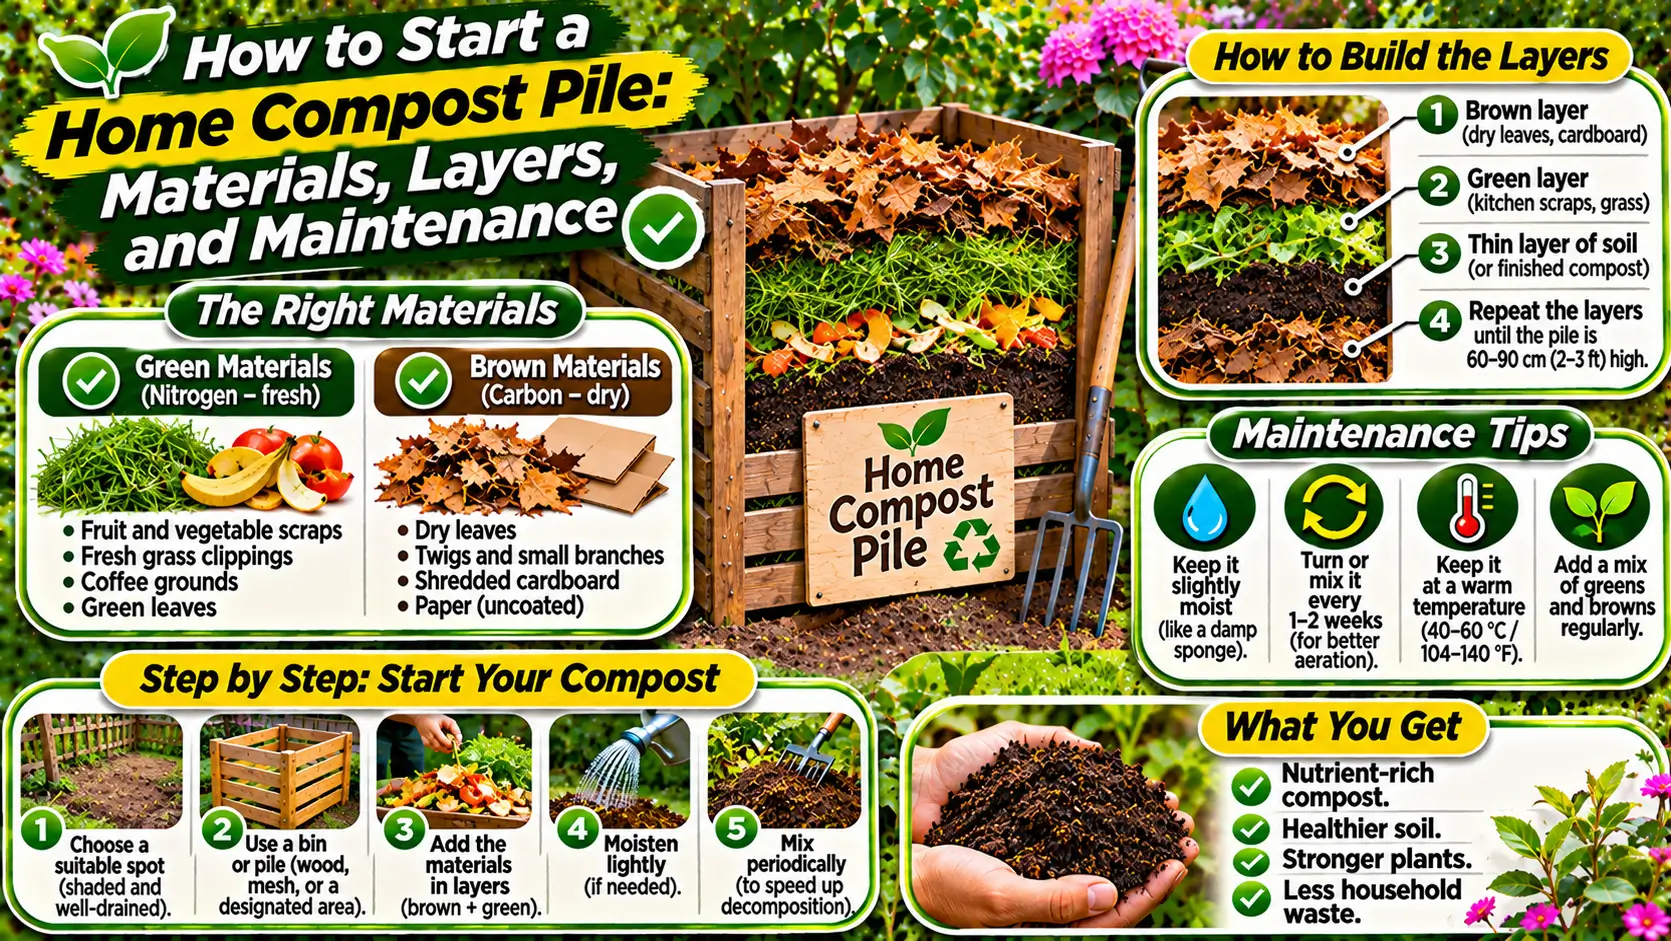
Composting is the controlled decomposition of organic materials into a stable, soil-like product. Microorganisms break down leaves, plant trimmings, fruit and vegetable scraps, and other suitable materials, while fungi and soil organisms contribute to the process. Finished compost can improve soil structure, support moisture retention, and return organic matter and nutrients to garden beds. It is not a complete replacement for every fertilizer, and its nutrient content varies with the materials used.
Table of Contents
- Choosing a composting location
- Understanding green and brown materials
- Building the first layers
- What should not go into a basic home pile
- Managing moisture
- Providing enough airflow
- Temperature and decomposition
- Managing odors and pests
- Knowing when compost is ready
- Using compost in the garden
- Creating a repeatable routine
- Frequently Asked Questions
Choosing a composting location
Choose a convenient, well-drained place with enough room to add materials and turn the pile. A location with some shade can help prevent the pile from drying too quickly in hot weather, while access to water makes moisture management easier. Avoid placing compost where runoff can enter drains or waterways. A bin can help keep materials contained and discourage animals, but an open pile can also work where space and local conditions permit.
Understanding green and brown materials
Compost ingredients are often grouped as greens and browns. Greens include fresh plant trimmings, fruit and vegetable scraps, coffee grounds, and fresh grass clippings. They generally provide nitrogen and moisture. Browns include dry leaves, straw, shredded untreated cardboard, and small dry stems; they provide carbon and help create structure. A successful pile needs a useful balance of both groups, rather than large amounts of one material alone.
Building the first layers
Start with a coarse layer of small twigs or dry stems if the bin needs better airflow at the base. Add alternating layers of browns and greens, breaking large pieces into smaller pieces so they decompose more evenly. Cover food scraps with a layer of browns to reduce odors and discourage pests. Exact proportions can vary with material moisture and particle size, so observe the pile and adjust rather than relying on a rigid recipe.
What should not go into a basic home pile
Avoid meat, fish, bones, dairy products, oils, and cooked foods in a simple backyard pile because they can attract animals and create odors. Do not add pet waste, diseased plants, invasive weeds with mature seeds, or materials contaminated with chemicals. Glossy or heavily coated paper, treated wood, and synthetic materials do not belong in ordinary compost. Some municipal or hot-compost systems accept additional materials, but follow the rules for the specific system you use.
Managing moisture
A compost pile should feel like a wrung-out sponge: moist but not dripping wet. If it is too dry, microbial activity slows; if it is saturated, air spaces fill with water and the pile may become unpleasantly anaerobic. Check moisture inside the pile rather than judging only the surface. Add water gradually to dry materials, or mix in dry browns when the pile is too wet. Covering the pile can help protect it from heavy rain and excessive drying.
Providing enough airflow
Composting organisms need oxygen in an active aerobic pile. Turning or loosening the material helps restore air spaces and distributes moisture and decomposing material. A pile that becomes compacted, slimy, or strongly unpleasant may lack sufficient oxygen. Mix in coarse browns such as dry leaves or small stems to improve structure. Do not turn so often that the pile never has time to heat and decompose; adjust the frequency to the system and the condition of the material.
Temperature and decomposition
An active compost pile may warm as microorganisms break down fresh materials. Temperature depends on pile size, moisture, ingredient balance, and weather. A small pile may decompose slowly without becoming very hot. Hot composting can reduce some weed seeds and pathogens when the entire mass reaches and maintains appropriate conditions, but a typical backyard pile may have cooler edges and pockets. Do not assume every pile has been sanitized simply because its center feels warm.
Managing odors and pests
A healthy, well-aerated compost pile should have an earthy smell. Sour or rotten odors often indicate excess moisture, too many wet greens, or insufficient airflow. Add dry browns and turn the material to correct the balance. Bury fruit and vegetable scraps in the center and keep them covered. Use a secure bin or suitable mesh barrier where rodents or other animals are a concern. Never add meat or oily leftovers to a basic open pile.
Knowing when compost is ready
Finished compost is usually dark, crumbly, and earthy-smelling, with most original materials no longer recognizable. Some woody pieces may remain and can be screened out for another cycle. Immature compost may heat again after turning, smell sour, or contain recognizable food scraps. Allow additional curing time when uncertain. Using unfinished material around sensitive seedlings can cause problems because decomposition may temporarily tie up nitrogen or create unfavorable conditions.
Using compost in the garden
Spread mature compost over beds as a surface amendment or mix a suitable amount into the upper soil layer before planting. It can also be used around established plants as a light top dressing, keeping material away from direct contact with stems and crowns. Compost is not automatically sterile, and its nutrient content is not standardized. Avoid applying excessive amounts, especially where phosphorus is already high. Use soil tests and plant needs to guide regular applications.
Creating a repeatable routine
A reliable compost routine is simple: collect suitable browns, add greens in manageable amounts, cover food scraps, monitor moisture, and maintain airflow. Keep a small container for kitchen scraps and empty it regularly. Record what goes into the pile and note whether it becomes too wet, dry, or compacted. With time, the pile becomes easier to manage and provides a steady source of organic matter for the garden.
Before making a major change, consider the whole growing area rather than one plant in isolation. Soil conditions can differ between beds, containers, and areas near buildings or paths. A small test and a few observations about drainage, moisture, and plant performance can prevent unnecessary amendments. Keep changes gradual so you can identify which practice actually improves the growing conditions.
Use clean tools and materials from a reliable source. Organic materials can vary in maturity, salt content, nutrient concentration, and possible contaminants. If the source or composition is unclear, do not apply it around edible crops or sensitive plants. Follow local guidance and product labels, especially when handling animal-derived materials or commercial soil amendments.
Good soil management also depends on protecting the surface. Avoid leaving beds bare for long periods where erosion, crusting, or rapid moisture loss is a concern. Suitable mulch, cover crops, and living roots can protect the soil and support biological activity. Choose a cover that fits the climate and crop rotation, and prevent unwanted plants from setting seed.
Remember that soil amendments are not instant cures for every growth problem. Plants also need suitable light, temperature, water, space, and healthy roots. If a plant remains weak after a soil improvement, reassess the diagnosis rather than applying more products automatically. A measured approach is usually more effective and less expensive than repeated trial-and-error treatments.
Record the date, material, approximate amount, and area treated whenever you amend soil. Note how the soil behaves after rain or irrigation and how plants respond during the following growing period. These records help you avoid excessive applications and make future decisions more accurate. Soil improves through consistent care, observation, and adjustments based on evidence.
For further reading, explore these related guides on soil care and plant management: How to Make and Use Leaf Mold for Healthier Garden Soil and How to Use Composted Manure Safely in Vegetable and Flower Gardens. For additional research-based recommendations, consult University of Illinois Extension’s practical guide to starting a home compost pile.
- How to Make and Use Homemade Compost Tea Responsibly
- How to Use Cover Crops to Protect and Improve Garden Soil
Compost pile materials guide
| Material group | Examples | Role in the pile |
|---|---|---|
| Greens | Vegetable scraps, fresh plant trimmings, coffee grounds | Supply nitrogen and moisture |
| Browns | Dry leaves, shredded cardboard, small dry twigs | Supply carbon and help maintain structure |
| Water | Clean water added as needed | Keeps decomposition active; pile should be moist, not saturated |
| Air | Loose layering and occasional turning | Supports aerobic decomposition and helps limit odors |
| Avoid | Meat, dairy, oils, pet waste and diseased plants in a basic home pile | Can attract pests or introduce unwanted risks |
Related Gardening Guides
Explore these related guides for more practical ideas and planning advice:
- How to Make and Use Leaf Mold for Healthier Garden Soil
- How to Use Composted Manure Safely in Vegetable and Flower Gardens
- How to Use Worm Castings in the Garden: Benefits and Best Practices
Frequently Asked Questions
What is the right balance of green and brown compost materials?
A compost pile needs a mix of nitrogen-rich green materials and carbon-rich brown materials. Adjust the balance based on moisture, texture, and odor; the pile should be damp like a wrung-out sponge, not waterlogged.
Can I compost food scraps in a home pile?
Many fruit and vegetable scraps are suitable for a basic home compost pile. Avoid meat, dairy, oils, and other materials that attract pests unless using a system specifically designed to handle them.
Why does my compost pile smell bad?
A strong unpleasant odor often indicates excess moisture, poor airflow, or too much compacted green material. Add dry browns, turn or loosen the pile, and protect it from excessive rain.
How do I know when compost is ready to use?
Finished compost is dark, crumbly, and earthy-smelling, with most original materials no longer recognizable. Let unfinished material continue decomposing before using it around sensitive plants.

6 thoughts on “How to Start a Home Compost Pile: Materials, Layers, and Maintenance”